
Free Event App

Free Event App

Did You Know?

You can choose a font for you event in mobile.

Getting Started

Conf.app goes beyond the classic video conference tools. It’s designed to create an app where you can build an agenda for a single day or multiple days event, and where each entry of the agenda can embed a link or the video player of a virtual event. You can actually embed anything you need, many of our customers would use google doc to create practical information pages, google form to collect some data, google maps to indicate the event location for example. You could also include links to various tools like whatsapp, sli.do etc.
Product tour

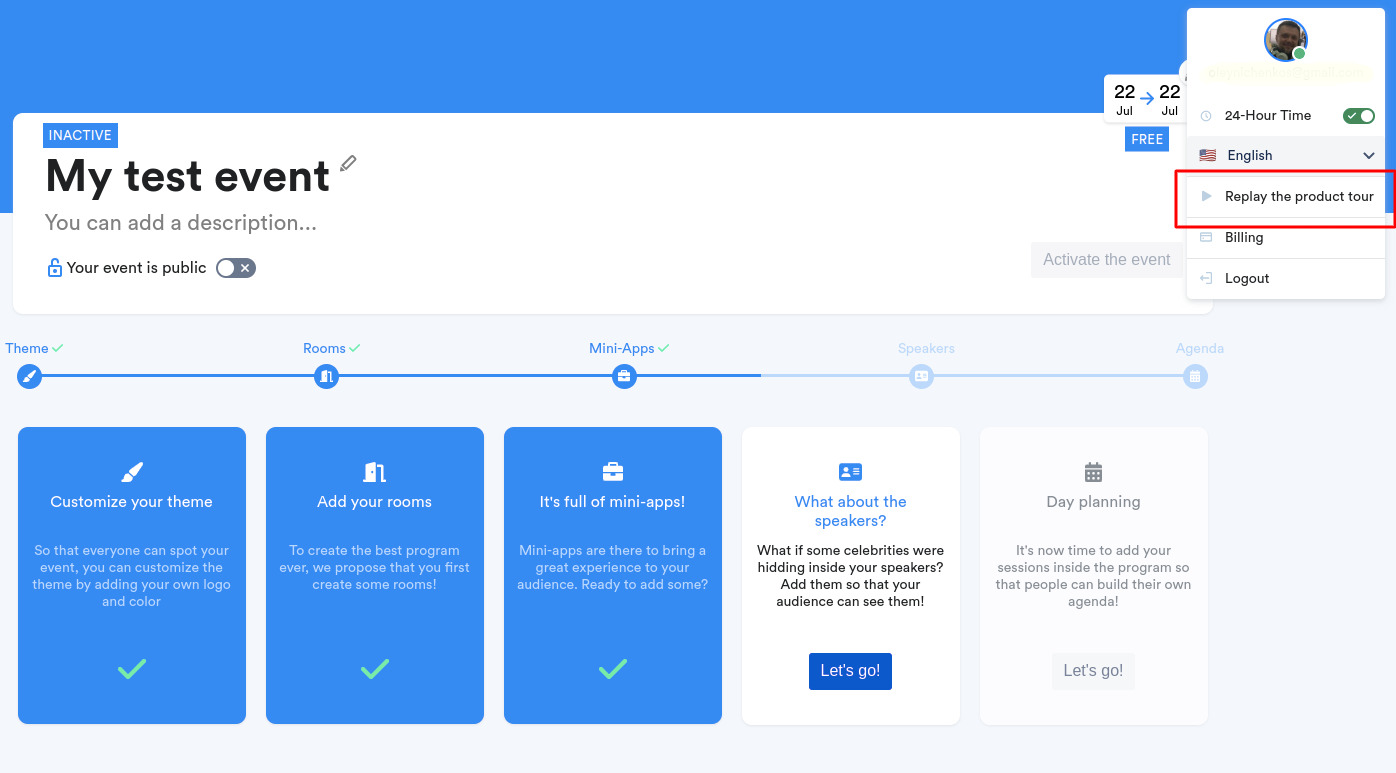
To get a general idea of the app creation process, you can watch our product tour. To access this functionality, simply enter one of your events and click on the “Replay product tour” button.

Also you can check out tutorial videos on our YouTube channel or watch the video guide using the link below.

Roles and Permissions

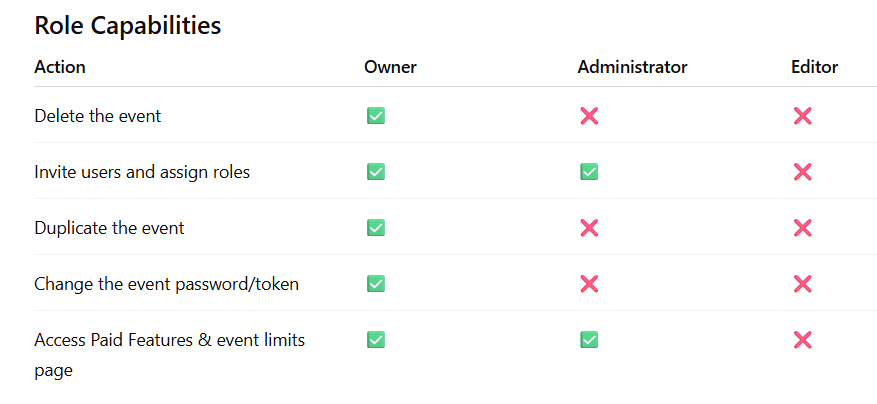
Each event has the following possible roles:

Who is the Owner?

The Owner is always the person who created the event. This role cannot be transferred or assigned, except with the help of the support team.

Can roles be changed later?

The Owner or Administrators can delete the role of invited users at any time, and create a new one except that no one can become the Owner.

Can a role be assigned to an unregistered user?

No. Roles can only be assigned to users who are already registered in conf.app. If the email is not registered, the user must first create an account before a role can be assigned.

Can I add a new permission or create a new role?

Yes, but only by request to the support team. Requests must include the purpose and details so the team can review and approve the change in line with event management policies.

Demo app

You can find a demo app QR code on conf.app website

Scan the QR code below to experience a sample event application developed with Conf.app. Please keep in mind that Conf.app offers an open architecture through its “Mini-apps” mechanism, allowing you to effortlessly customize and enrich the event application with your own resources.

Product tour

To get a general idea of the app creation process, you can watch our product tour. To access this functionality, simply enter one of your events and click on the “Replay product tour” button.

Also you can check out tutorial videos on our YouTube channel or watch the video guide using the link below.

Roles and Permissions

Each event has the following possible roles:

Who is the Owner?

The Owner is always the person who created the event. This role cannot be transferred or assigned, except with the help of the support team.

Can roles be changed later?

The Owner or Administrators can delete the role of invited users at any time, and create a new one except that no one can become the Owner.

Can a role be assigned to an unregistered user?

No. Roles can only be assigned to users who are already registered in conf.app. If the email is not registered, the user must first create an account before a role can be assigned.

Can I add a new permission or create a new role?

Yes, but only by request to the support team. Requests must include the purpose and details so the team can review and approve the change in line with event management policies.

Set up an event

Timezone

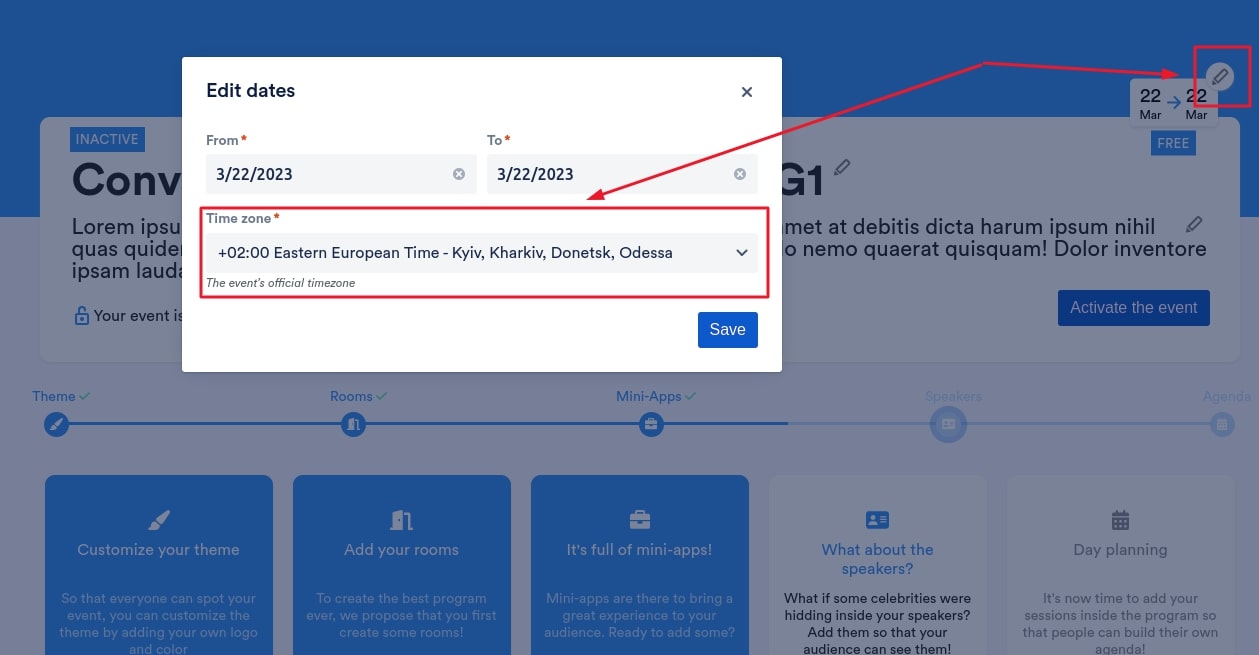
You can easily change the timezone of your event in our app. Go to the Dashboard page of your event, click the edit icon, and select your timezone from the dropdown that appears.

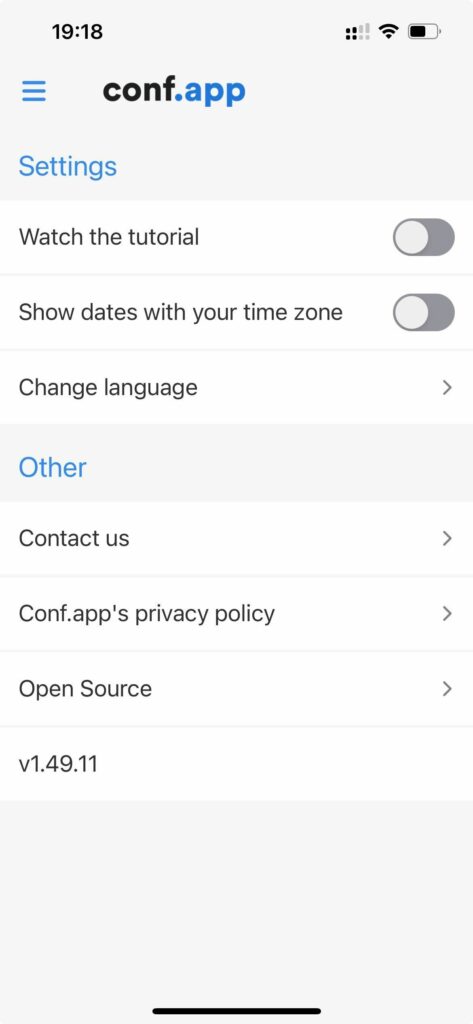
By default, your participants will see the agenda entries with the time defined for your configured timezone. They can also, if they prefer, automatically convert all the displayed time to their local timezone through the Conf.app settings menu.

Private access

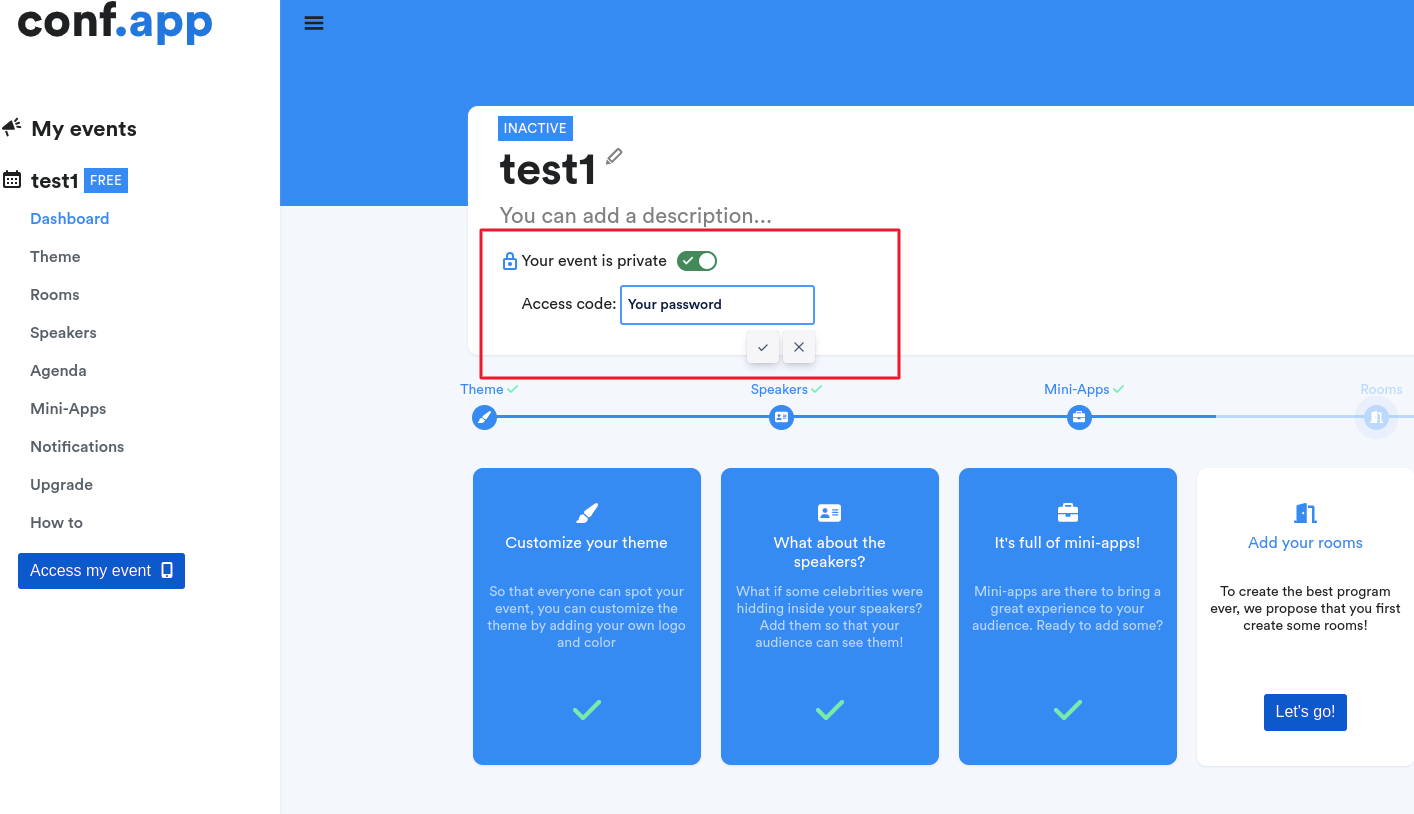
Private access enables you to secure the access to your event app by defining a password that users must provide to load your event app.

Import/Export Agenda

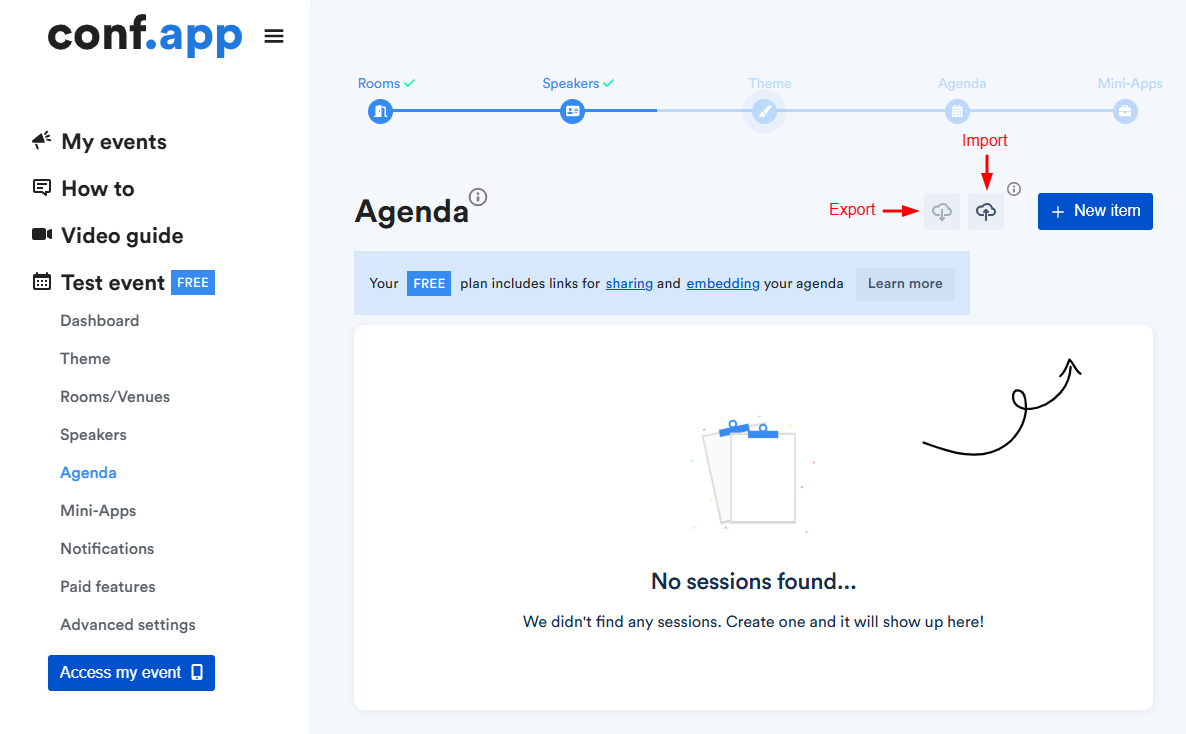
Conf.app enables you to export and import data for agenda in XLSX format. You can easily perform CRUD (Create, Read, Update, Delete) operations using the buttons displayed in the screenshot.

Agenda Export

To view data, use the Export button. Clicking it will download an XLSX file containing the relevant information. For editing data, we recommend using the downloaded file, which includes all the necessary columns for seamless updates.

Note: Agenda mini-apps are not included in the export. These can only be managed directly from the Conf.app dashboard.

Agenda Import

To start editing agenda using the XLSX file, we recommend creating at least one session first. Then, export the data by clicking on the Export icon and begin working with the downloaded file.
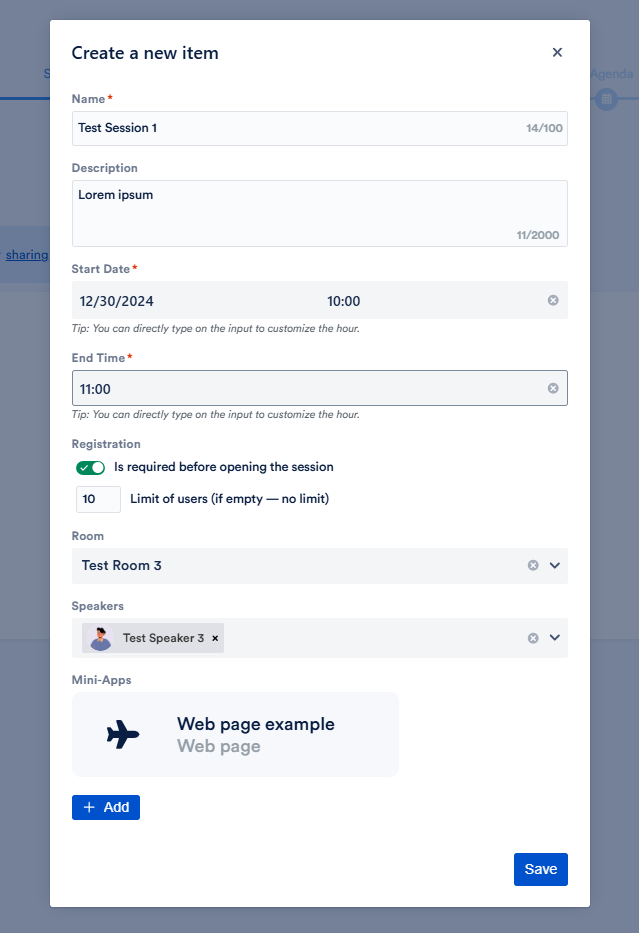
For example, let’s imagine you have already created two sessions named “Test Session 1” and “Test Session 2” with filling in all existing fields.

After exporting, the downloaded file will contain two rows, each displaying the session’s ID, Name, Description, Start and End dates, Registration Limit, Room, Tags and Speakers.

Note: Mini-apps are not included in the file, as they can only be managed through the Conf.app dashboard.

Update Session

To update any session information, simply modify the corresponding column in the XLSX file. Do not edit the “id” column — it serves as the unique identifier for an existing session.

To disable session registration, leave the cell in the registration_limit column empty. For unlimited registration, use the value -1.

The “name” field is required, so ensure this column is not left empty. You can also assign multiple speakers to a single session by using a semicolon (;) as a separator.

Mini-apps can be updated only after importing the data via the Conf.app dashboard.

Delete Session

To delete a session, simply remove the corresponding row from the XLSX file.

Create Session

To create a new session, add a new row in the XLSX file. Enter the session’s information in the corresponding columns and leave the “id” column blank.

Example

Let’s imagine we need to:
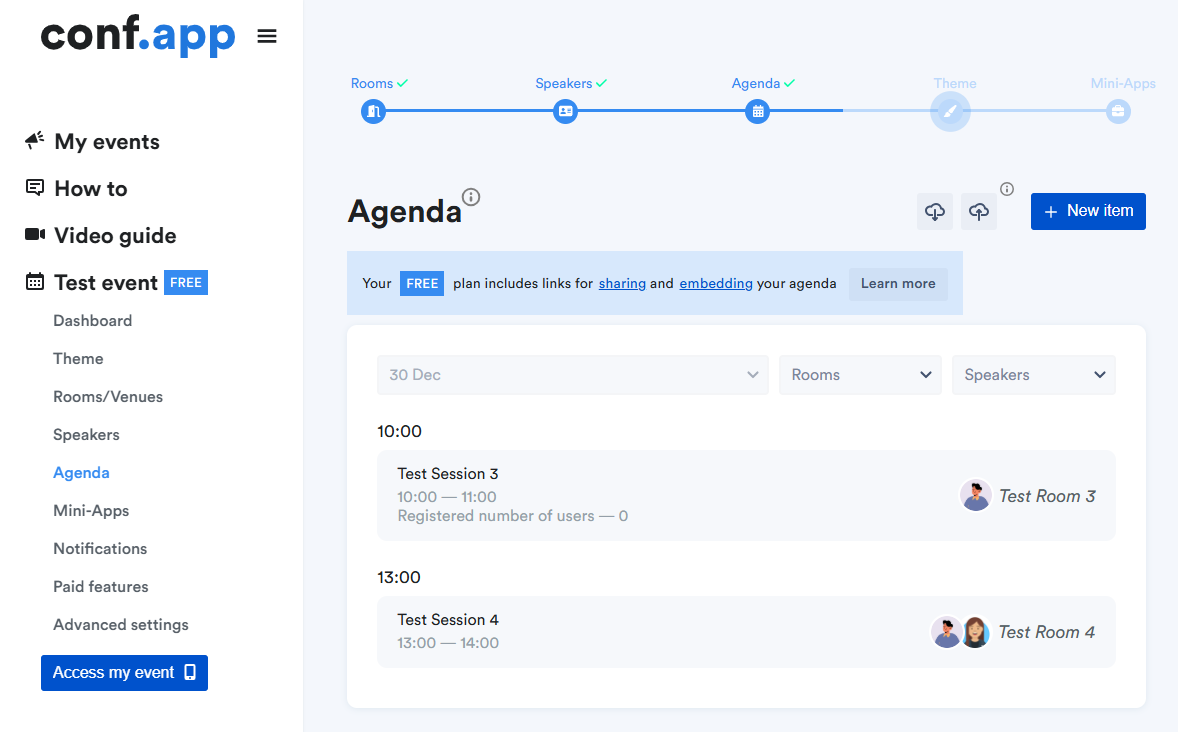
  • Rename the session “Test Session 1” to “Test Session 3”.
  • Delete the session “Test Session 2”.
  • Add a new session named “Test Session 4” without registration and with two speakers.
Following the above rules, the updated XLSX file will look like this:
Once your edits are complete, save the file and upload it using the Import button. As a result, you will see the updated agenda in Conf.app.

Import/Export Speakers

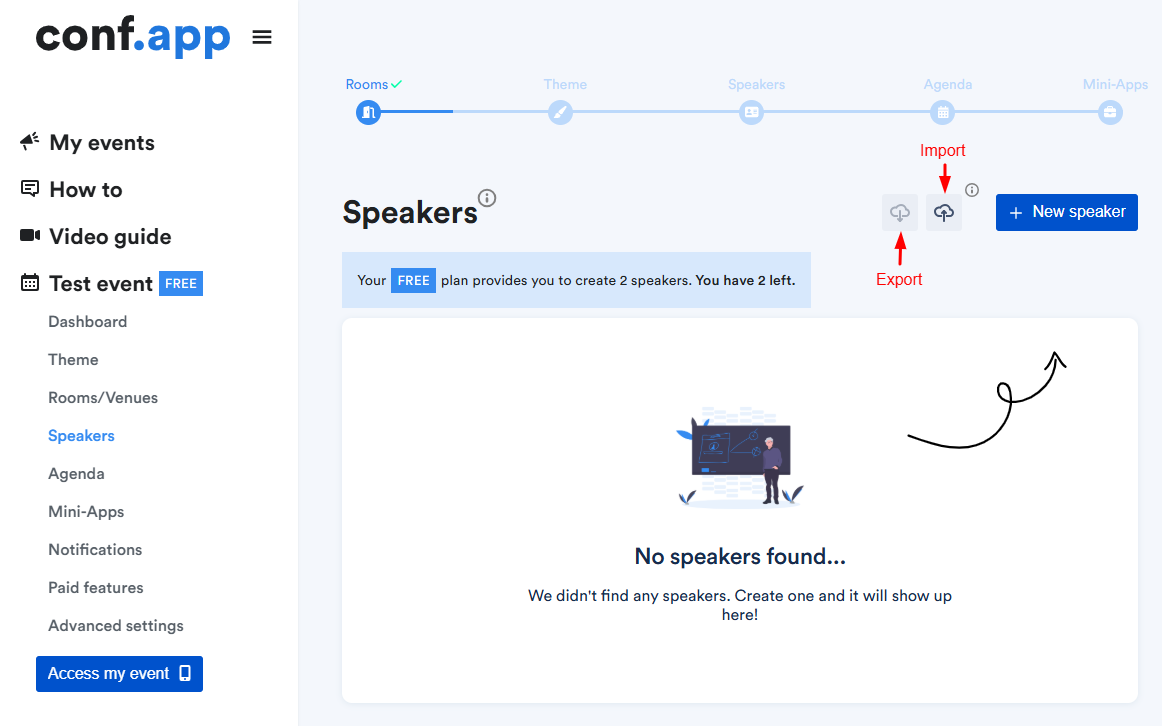
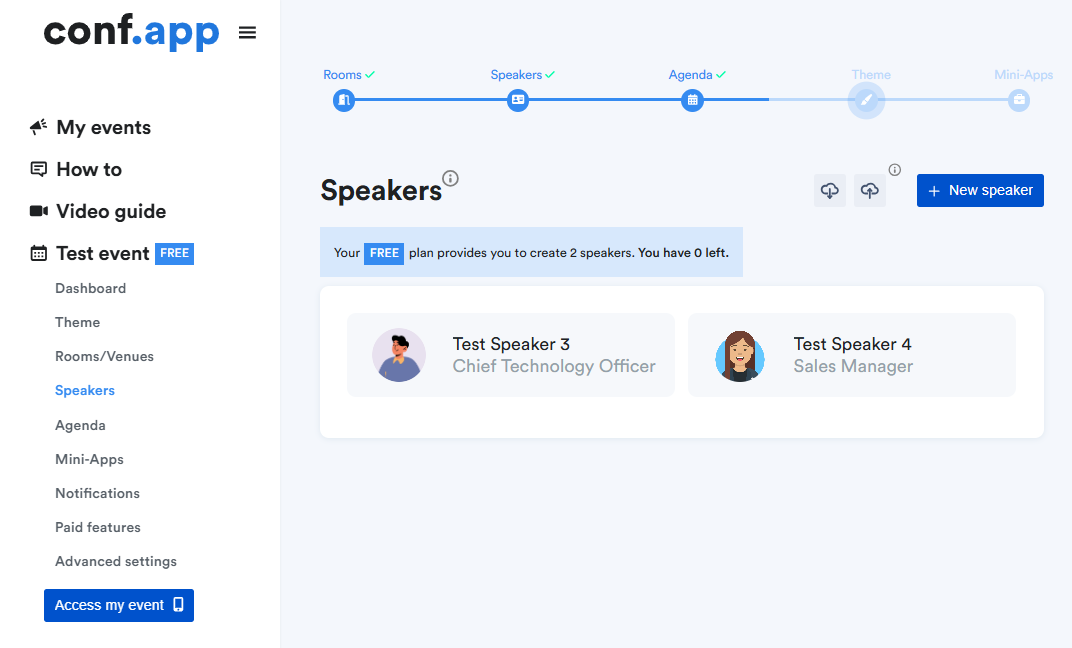
Conf.app enables you to export and import data for speakers in XLSX format. You can easily perform CRUD (Create, Read, Update, Delete) operations using the buttons displayed in the screenshot.

Speakers Export

To view data, use the Export button. Clicking it will download an XLSX file containing the relevant information. For editing data, we recommend using the downloaded file, which includes all the necessary columns for seamless updates.

Note: Speaker photo and social media details are not included in the export. These can only be managed directly from the Conf.app dashboard.

Speakers Import

To start editing speakers using the XLSX file, we recommend creating at least one speaker first. Then, export the data by clicking on the Export icon and begin working with the downloaded file.
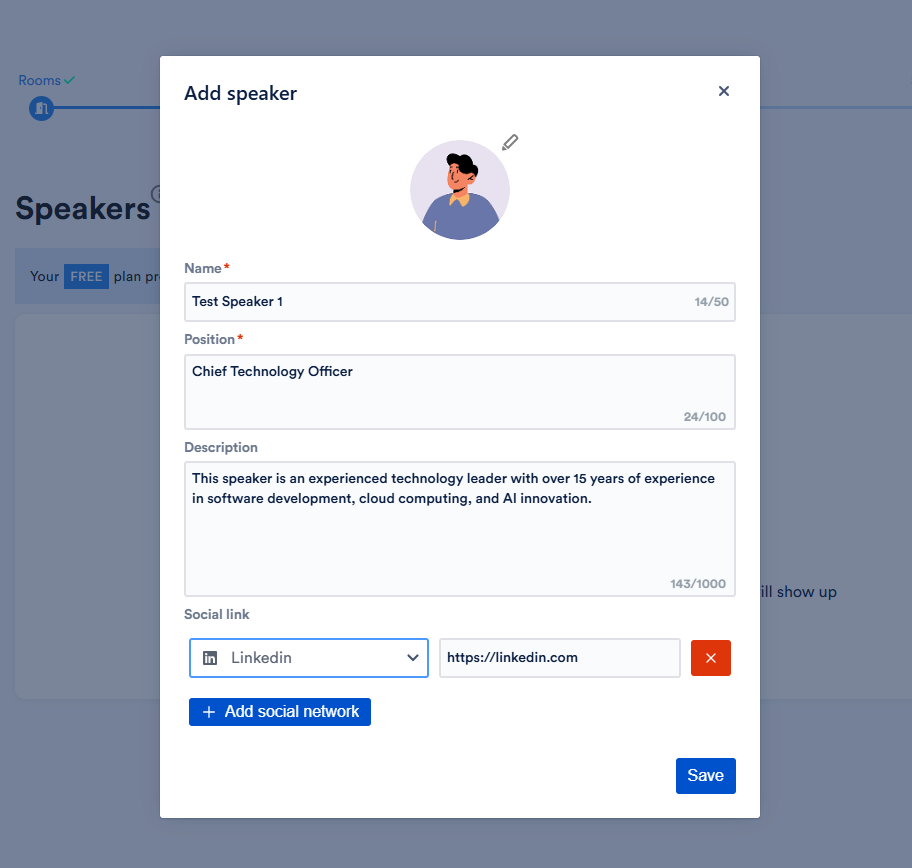
For example, let’s imagine you have already created two speakers named “Test Speaker 1” and “Test Speaker 2.” with filling in all existing fields.

After exporting, the downloaded file will contain two rows, each displaying the speakers’s ID, Name, Position and Description.

Note: Social media data and photo are not included in the file, as they can only be managed through the Conf.app dashboard

Update Speaker

To update any speaker information, simply modify the corresponding column in the XLSX file. Do not edit the “id” column — it serves as the unique identifier for an existing speaker.
The “name” and “position” fields are required, so ensure these columns are not left empty.
Social media data and photo can be updated only after importing the data via the Conf.app dashboard.

Delete Speaker

To delete a speaker, simply remove the corresponding row from the XLSX file.

Create Speaker

To create a new speaker, add a new row in the XLSX file. Enter the speaker’s information in the corresponding columns and leave the “id” column blank.

If you’d like to add a photo and social links, you can do so after importing the data via the Conf.app dashboard.

Example

Let’s imagine we need to:
  • Rename the speaker “Test Speaker 1” to “Test Speaker 3”
  • Delete the speaker “Test Speaker 2”.
  • Add a new speaker named “Test Speaker 4”.
Following the above rules, the updated XLSX file will look like this:
Once your edits are complete, save the file and upload it using the Import button. As a result, you will see the updated list of speakers in Conf.app.

Import/Export Rooms

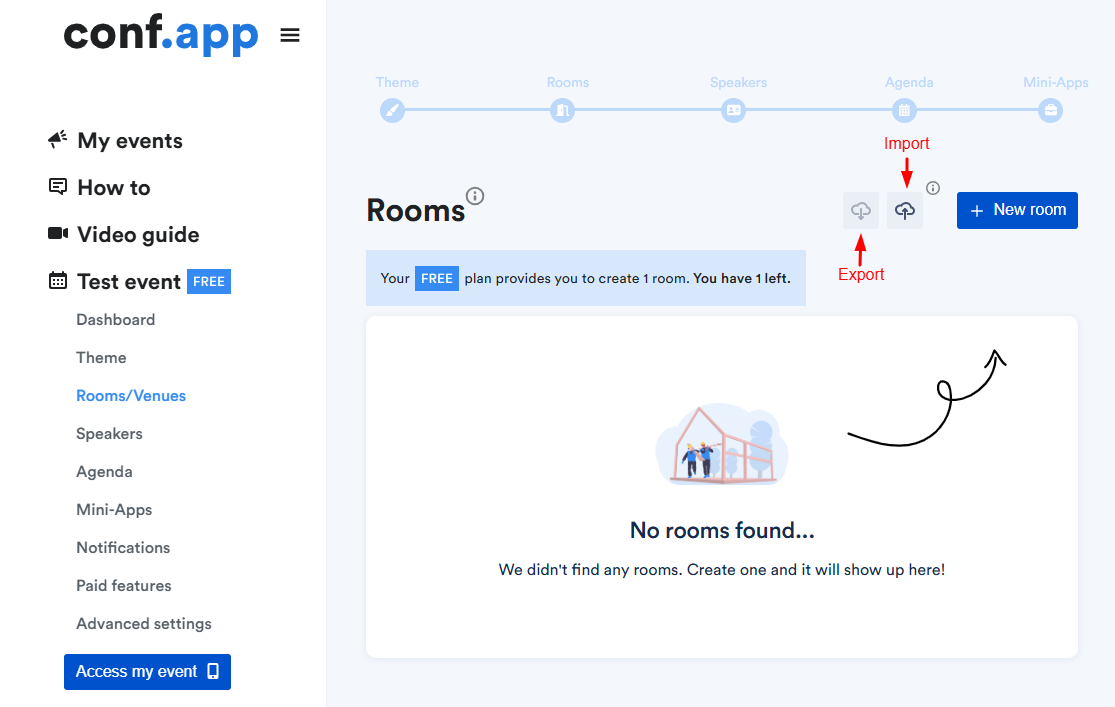
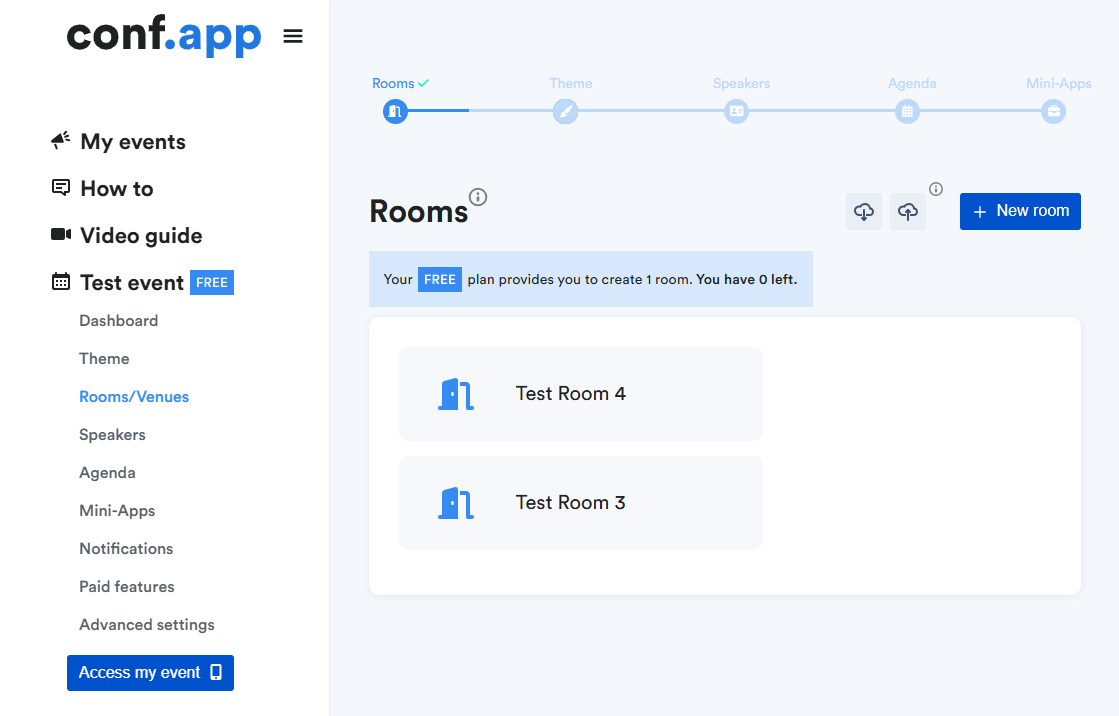
Conf.app enables you to export and import data for rooms in XLSX format. You can easily perform CRUD (Create, Read, Update, Delete) operations using the buttons displayed in the screenshot.

Rooms Export

To view data, use the Export button. Clicking it will download an XLSX file containing the relevant information. For editing data, we recommend using the downloaded file, which includes all the necessary columns for seamless updates.

Rooms Import

To start editing rooms using the XLSX file, we recommend creating at least one room first. Then, export the data by clicking on the Export icon and begin working with the downloaded file.

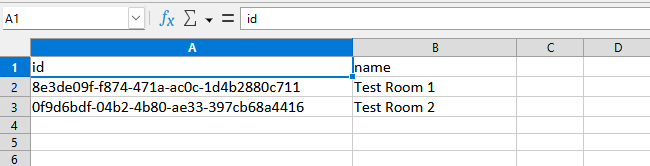
For example, let’s imagine you have already created two rooms named “Test Room 1” and “Test Room 2”. After exporting, the downloaded file will contain two rows, each displaying the room’s ID and Name.

Update Room

To rename a room, simply update the “name” column in the XLSX file with the desired new name. Do not edit the “id” column field value.

Delete Room

To delete a room, simply remove the corresponding row from the XLSX file.

Create Room

To create a new room, add a new row in the XLSX file. Write the room’s name in the corresponding “name“ column and leave the “id” column blank.

Example

Let’s imagine we need to:
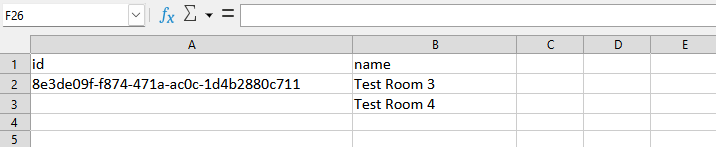
  • Rename the room “Test Room 1” to “Test Room 3”.
  • Delete the room “Test Room 2”.
  • Add a new room named “Test Room 4”.
Following the above rules, the updated XLSX file will look like this:
Once your edits are complete, save the file and upload it using the Import button. As a result, you will see the updated list of rooms in Conf.app.

Rooms / Venues

The Room tool is designed to configure venues, physical rooms, or any location where the presentations/activities for your event occur. They offer you the possibility to associate your event agenda entries with different locations.

Sponsors

There is way to add graphics like a sponsors logo to the agenda pages. On each agenda page, you can embed a mini-app, which can use any web page URL as a source. You can create some sponsor pages in an external website and embed them here.

See more details on how to embed a Google doc content, in “read-only” mode, see this page

Tradeshow participants

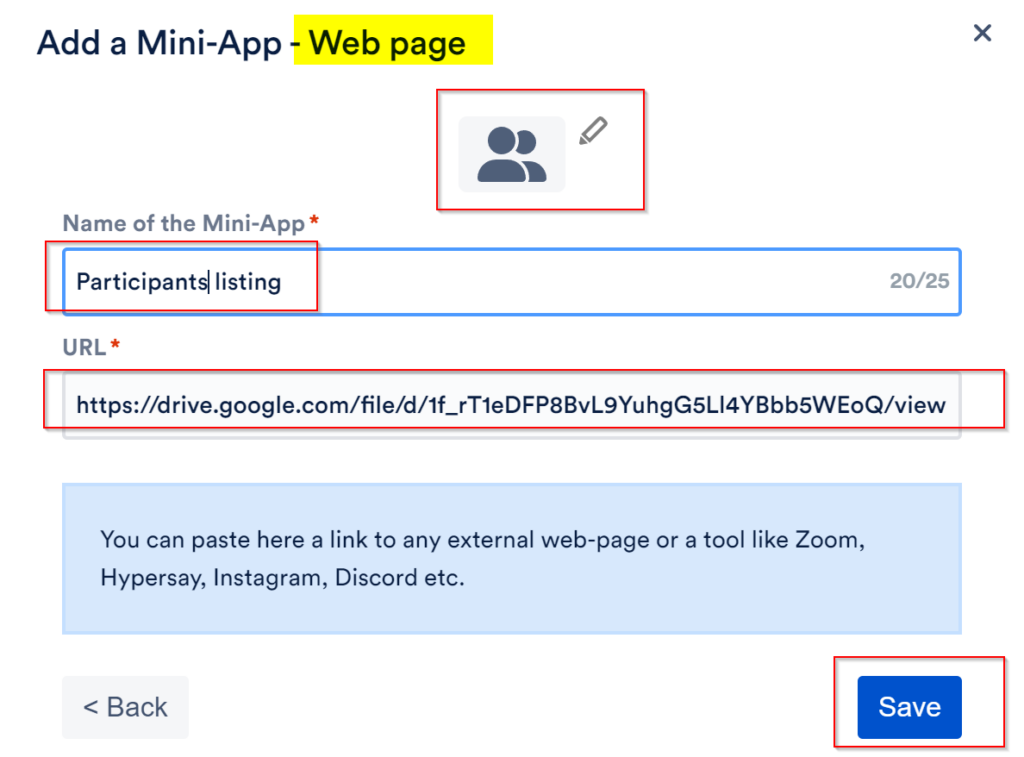
To add a downloadable PDF that contains the trade show participants with their logos and links to their websites, you can follow these steps to host the document.

  • You can create a PDF with the content you need and upload the PDF to your Google drive.

  • Allow access to anyone

  • Get the "share URL" of this PDF from Google drive and add it to your app event with the "Web page" mini-app.

Demo app

You can find a demo app QR code on conf.app website

Scan the QR code below to experience a sample event application developed with Conf.app. Please keep in mind that Conf.app offers an open architecture through its “Mini-apps” mechanism, allowing you to effortlessly customize and enrich the event application with your own resources.

Timezone

You can easily change the timezone of your event in our app. Go to the Dashboard page of your event, click the edit icon, and select your timezone from the dropdown that appears.

By default, your participants will see the agenda entries with the time defined for your configured timezone. They can also, if they prefer, automatically convert all the displayed time to their local timezone through the Conf.app settings menu.

Agenda

Time format

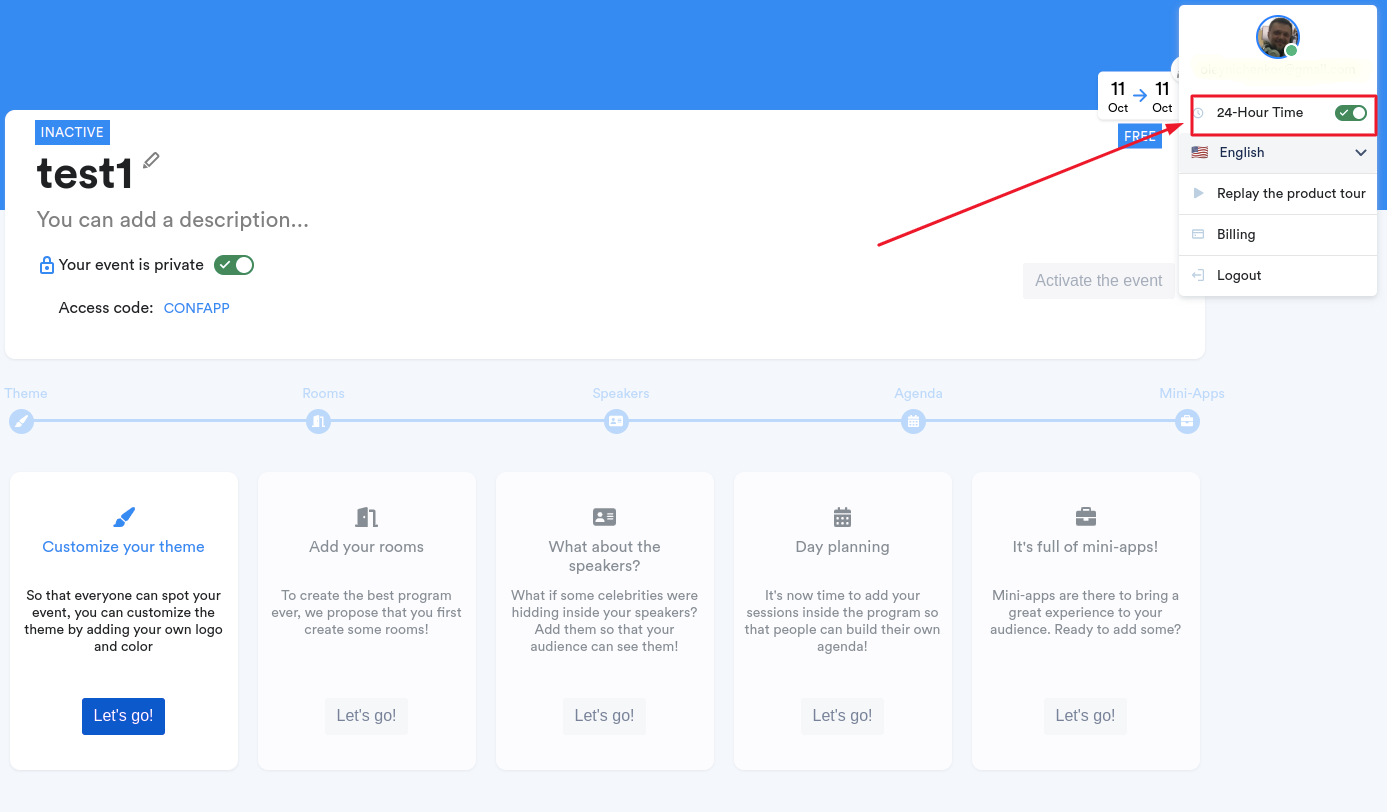
You can set the app program times to AM and PM instead of military hours.

Embedded agenda

Our service enables you to create and embed a program for your event directly on your website using the following link:

https://agenda.conf.app/{eventId}

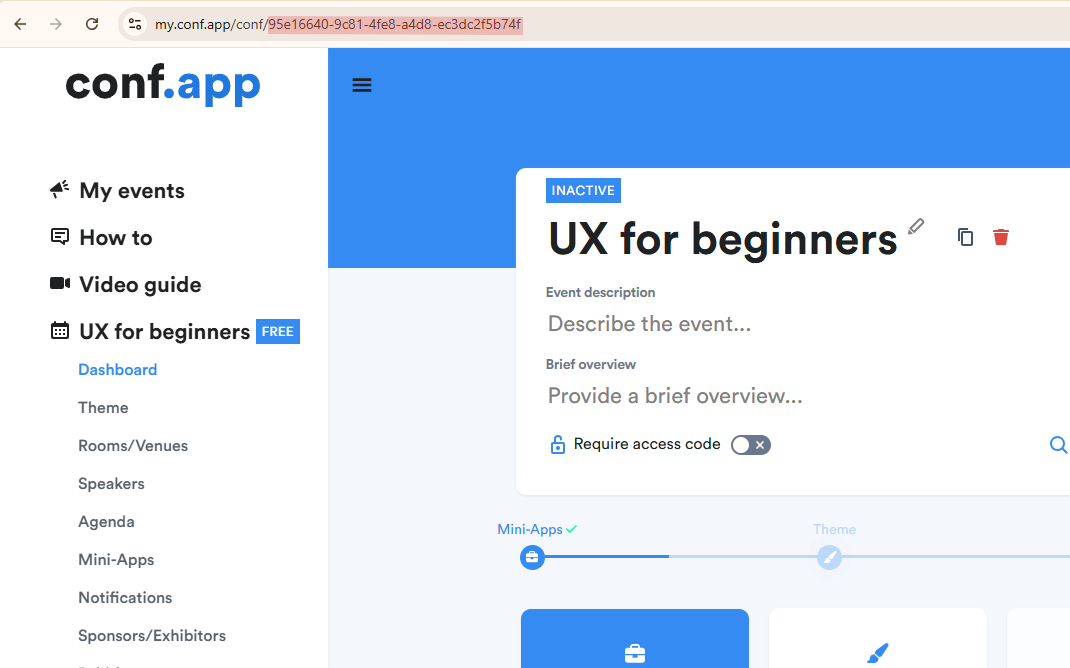
where {eventId} is the unique identifier for your event that can be found in dashboard url.

To embed your agenda on a website, use this code:
<iframe src="https://agenda.conf.app/{eventId}" height="100%" width="100%" style="border: none;"></iframe>
To see an example of how it will look, visit:

https://agenda.conf.app/244d8501-023e-4bdc-af1f-a581c01d84ec

Customization Options

We offer several options to customize the look of the program.
Hide Header
By default, the agenda view includes a header with the logo, date, and event description. To hide this header, add the following parameter to the URL:
?header=false
Example:

https://agenda.conf.app/244d8501-023e-4bdc-af1f-a581c01d84ec?header=false

Change Language

By default, the agenda view is displayed in English. To change the language, add the following parameter to the agenda URL:

?lang=de

Available languages are: en (English), de (German), it (Italian), zh (Chinese), pt (Portuguese), sp (Spanish), fr (French).

Example:

https://agenda.conf.app/244d8501-023e-4bdc-af1f-a581c01d84ec?lang=de

Change Timezone
By default, the agenda dates are shown in the event’s timezone. To change the timezone to the user’s local one, add the following parameter to the agenda URL:
?local_timezone=true
Change Time format
By default, the agenda time is shown in 12-hour format (with AM/PM). To switch to 24-hour format, add the following parameter to the agenda URL:
?24_hour_time=true

Sample code: Embed a Spanish agenda without header, using local timezone and 24-hour format

<iframe style="border: none;" src="https://agenda.conf.app/244d8501-023e-4bdc-af1f-a581c01d84ec?lang=es&header=false&local_timezone=true&24_hour_time=true" width="100%" height="100%"></iframe>

Session time

Conf.app’s agenda builder offers convenient access to time intervals in 30-minute increments.

However, if your agenda entry’s time isn’t divisible by 30 minutes, you can input it manually. Remember to use the 24-hour format. For example, for 1:20 PM, type 13:20 instead.

To input manually, click on the time field and begin typing to edit the default content.

Miniapp for agenda entries

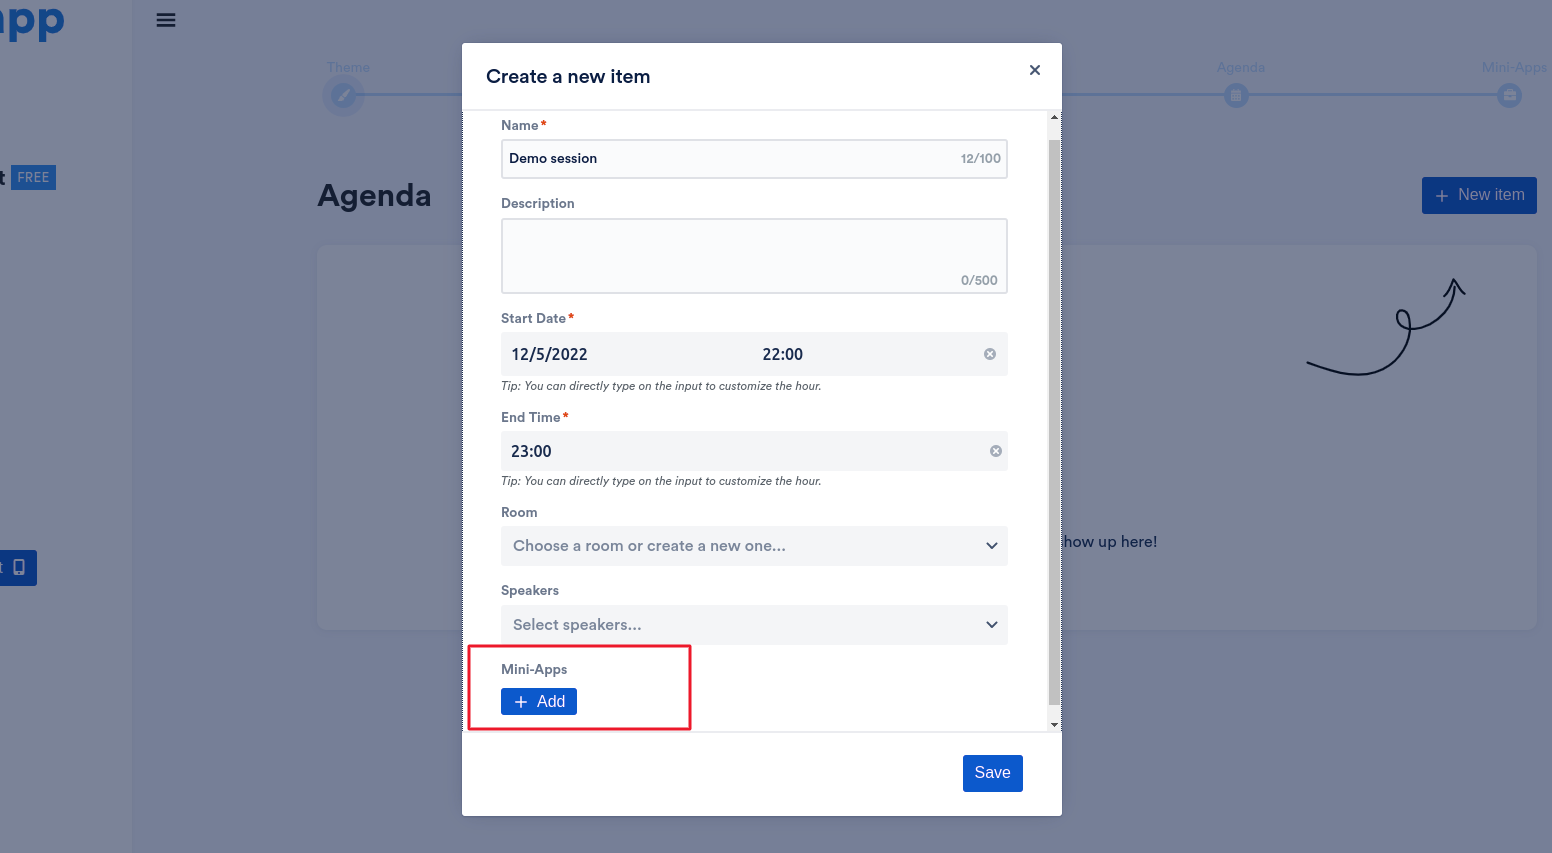
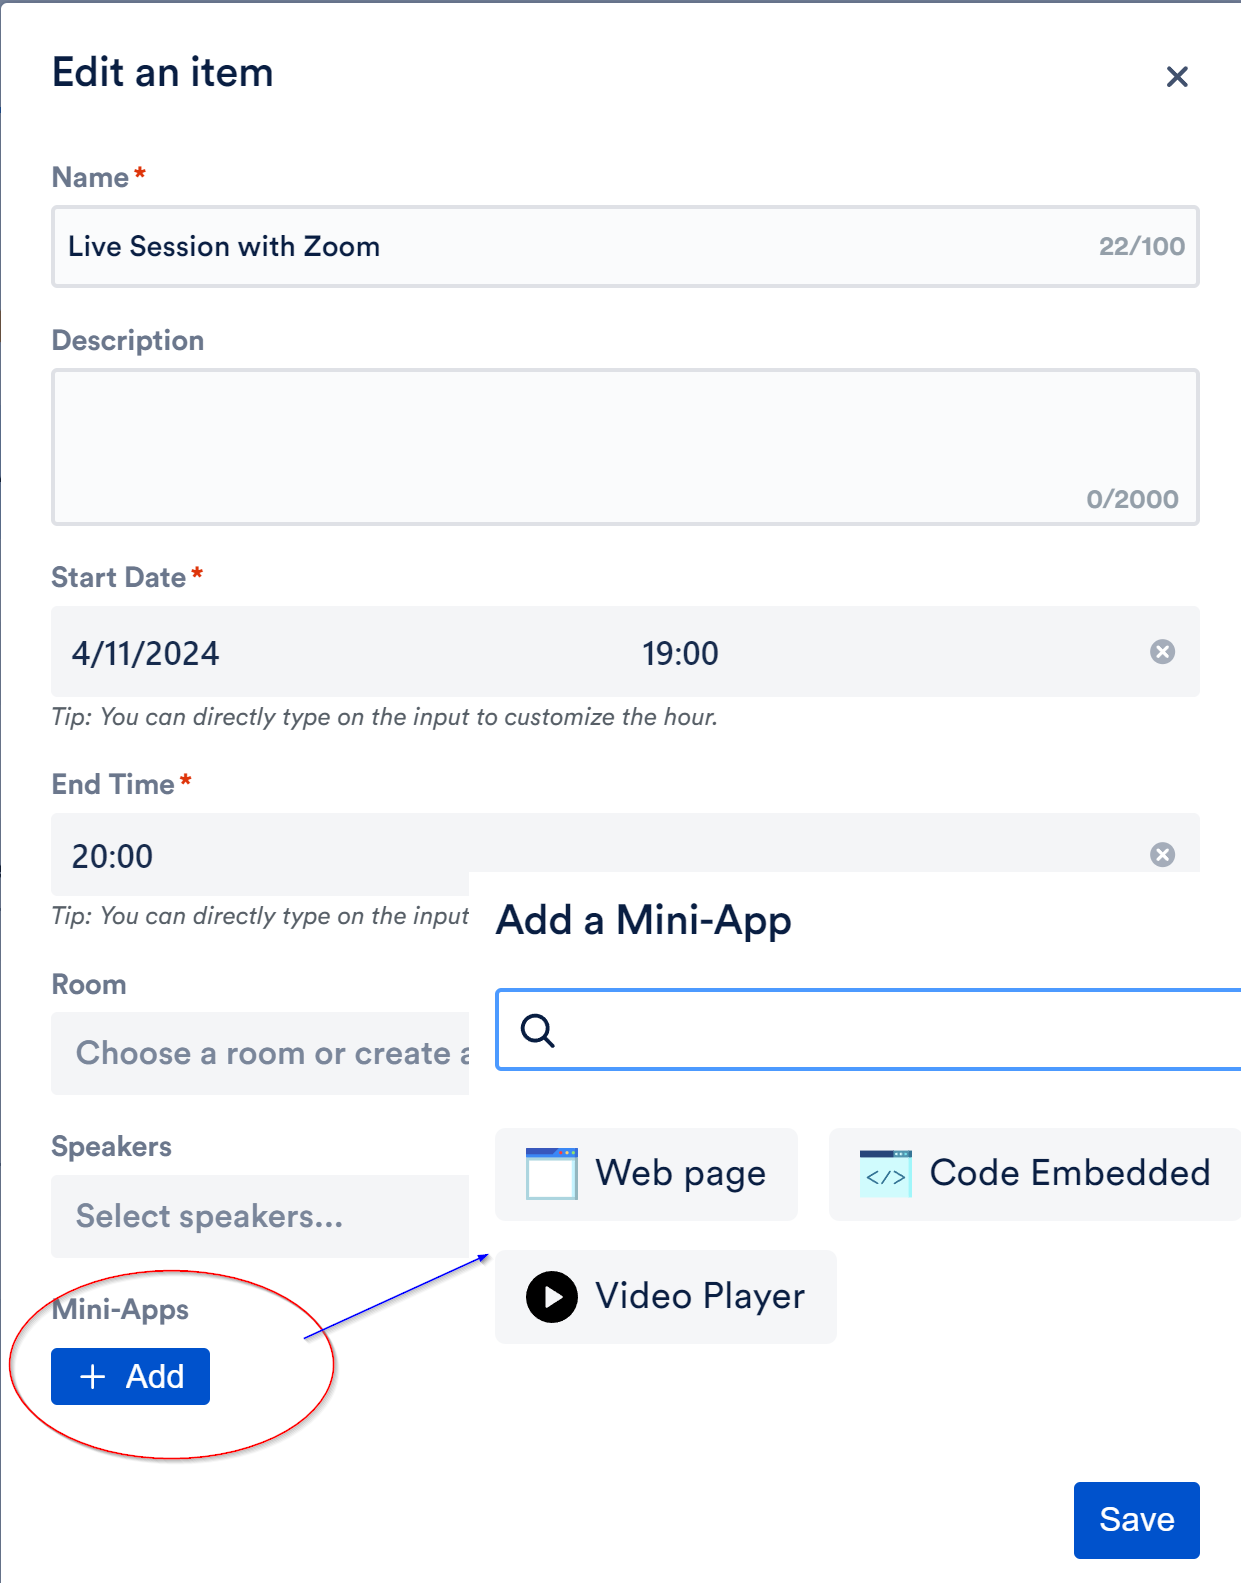
It is possible to enhance each of your event’s agenda entries with rich and contextual tools. For example, you can add live meeting streaming video, and you could also add live question/polling tools such as Slido directly to the session page.

Mini-Apps

Sponsors & Exhibitors Setup

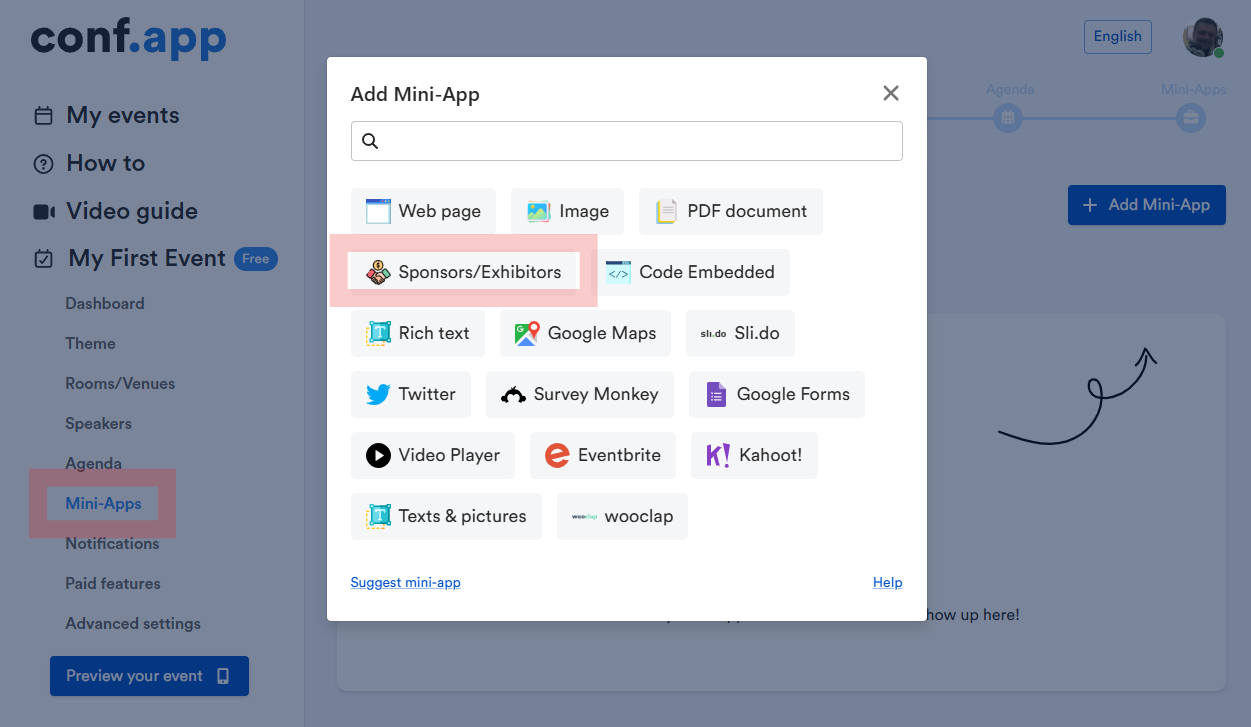
To showcase sponsors, exhibitors, media partners, and similar participants, you can add dedicated pages, sections, widgets, or menu items. 

This is handled by the Sponsors / Exhibitors mini-app, which you can find in the mini-apps list and add as many times as needed.

Mini-app settings

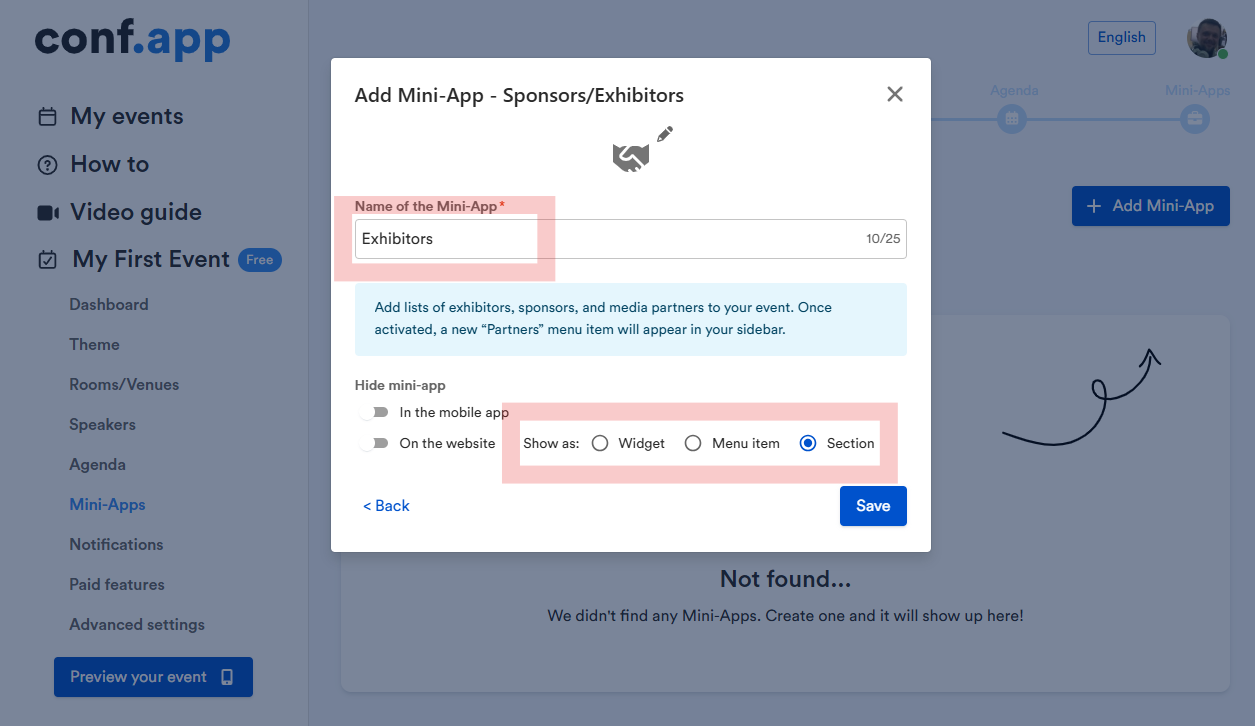
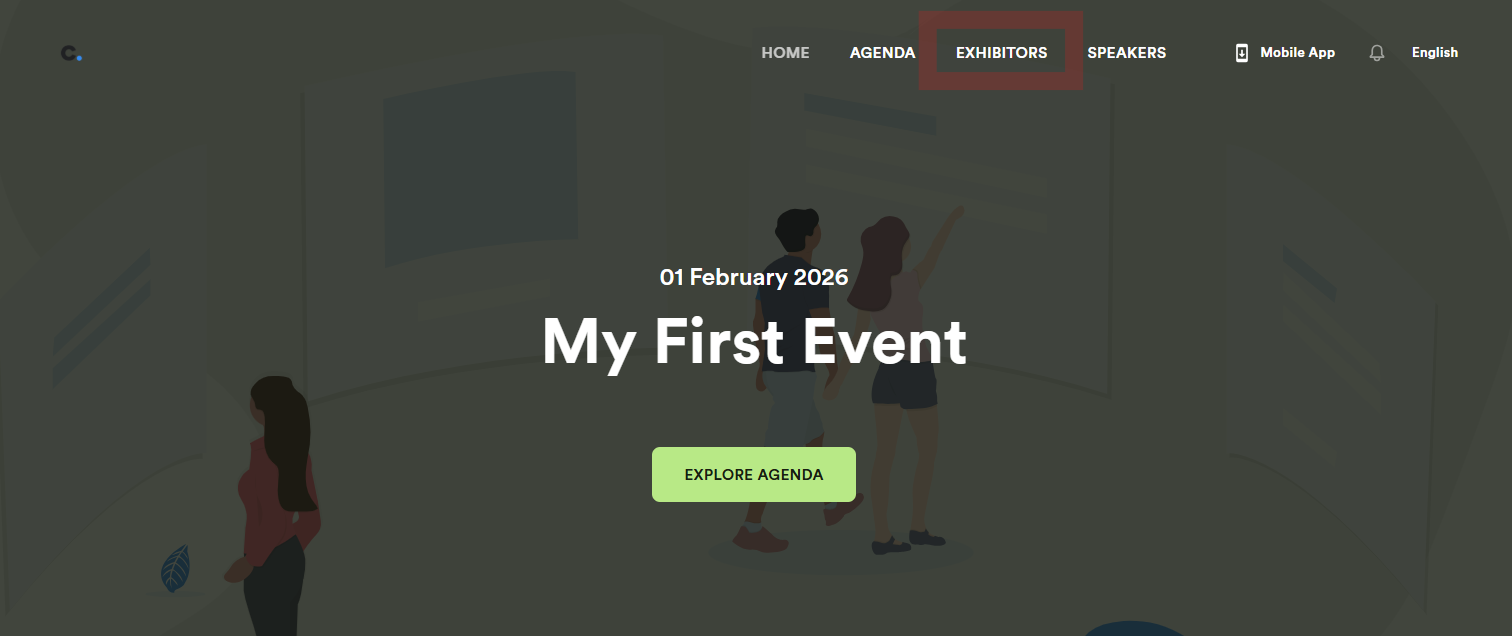
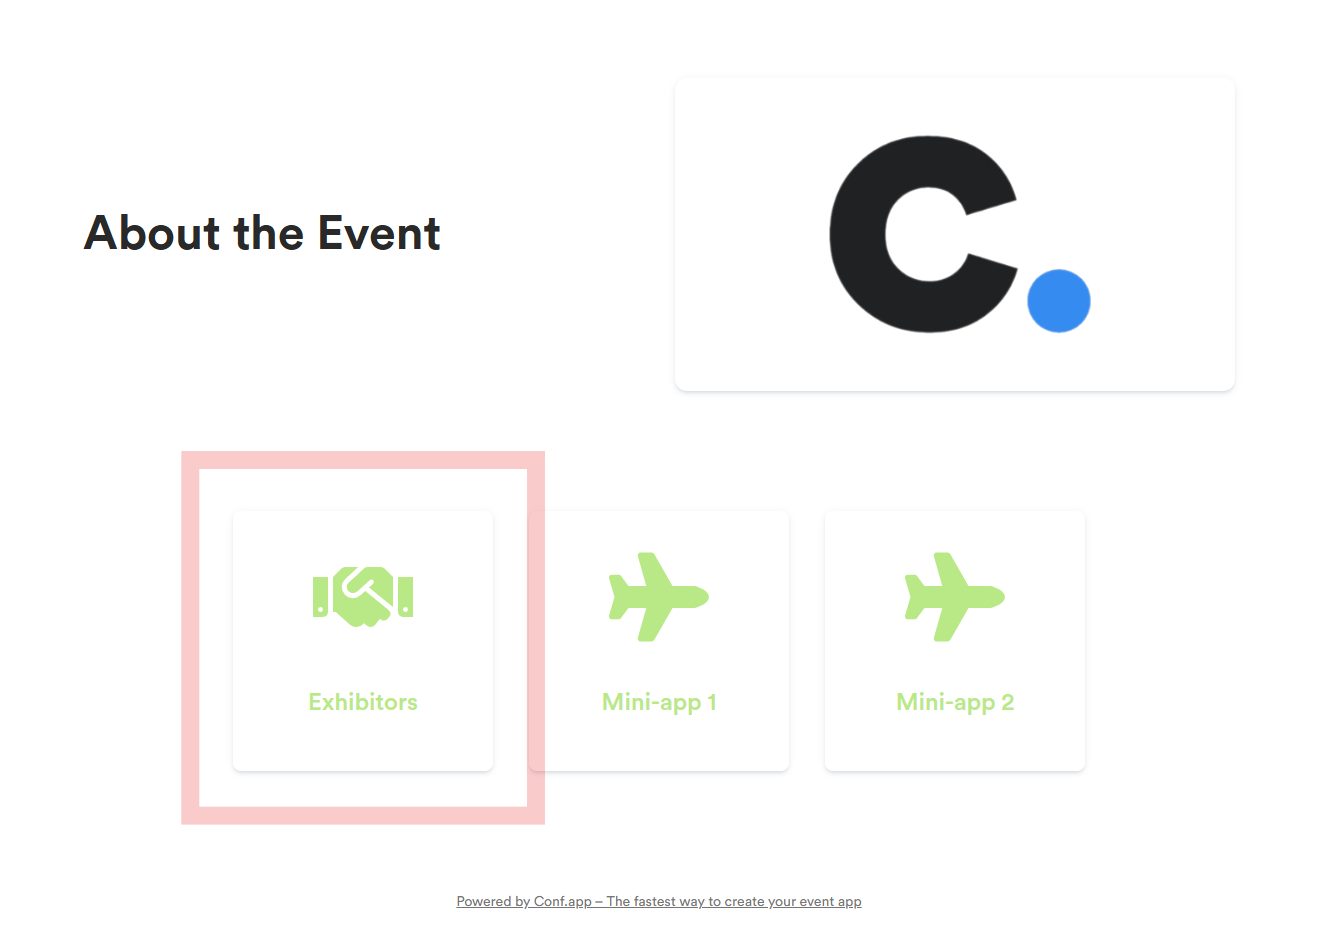
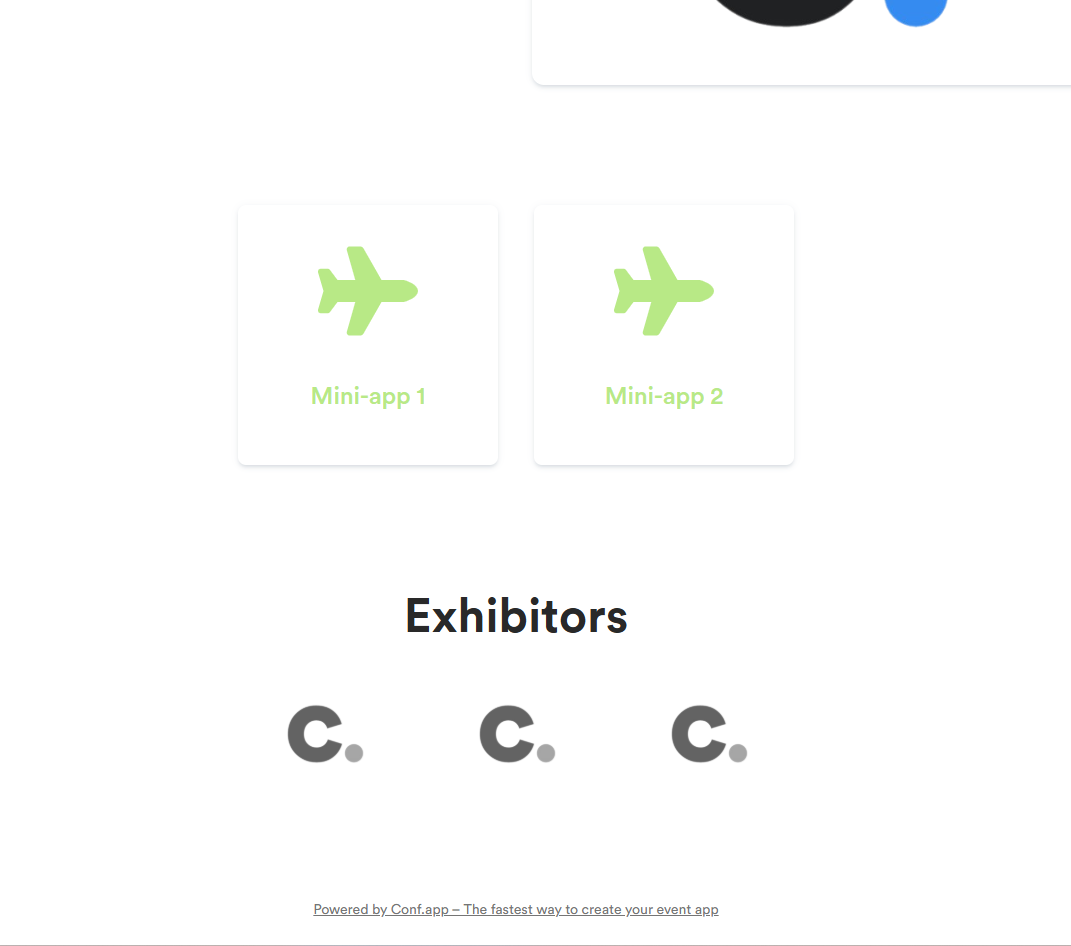
You can rename the mini-app, choose whether it should be shown separately in the mobile app or on the event website, and select how the data is displayed on the event website — as a widget, a menu item, or a section on the front page.

Managing Entries

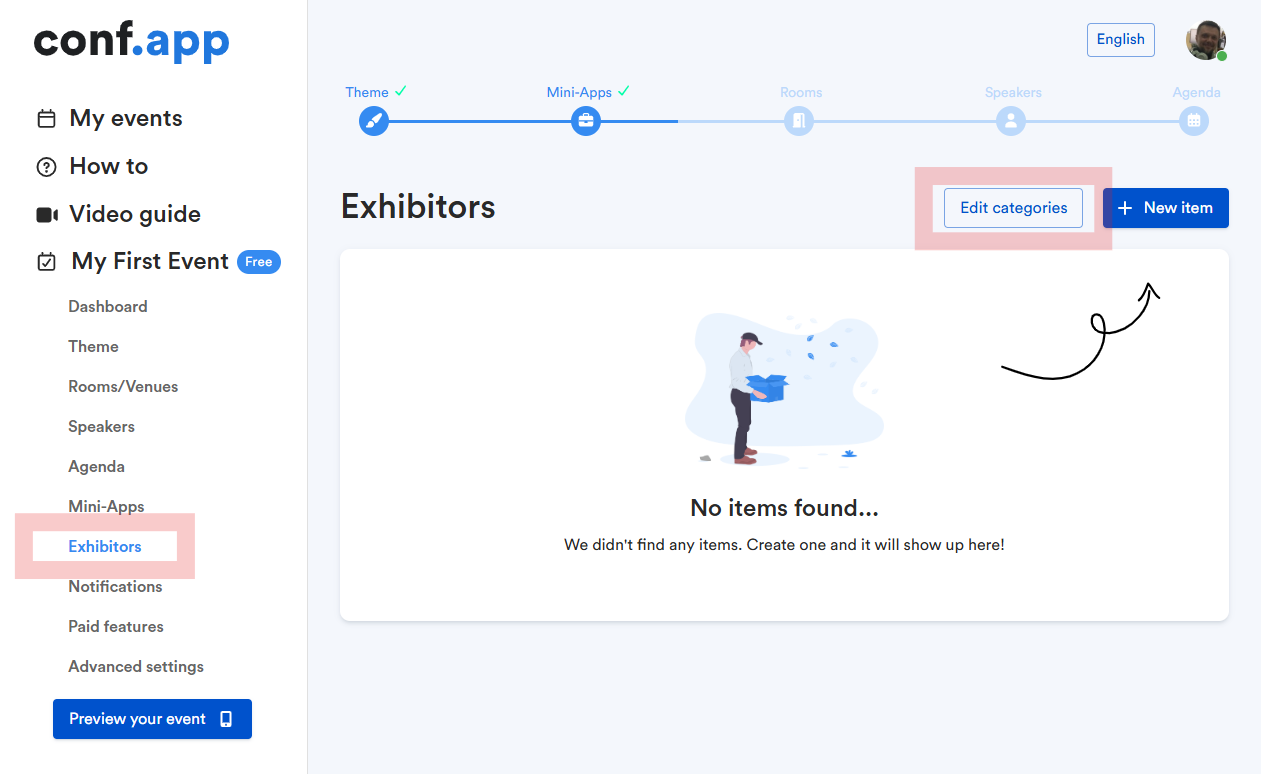
After saving the mini-app, a menu item will appear in the left sidebar, where you can add categories and create items for your mini-app.

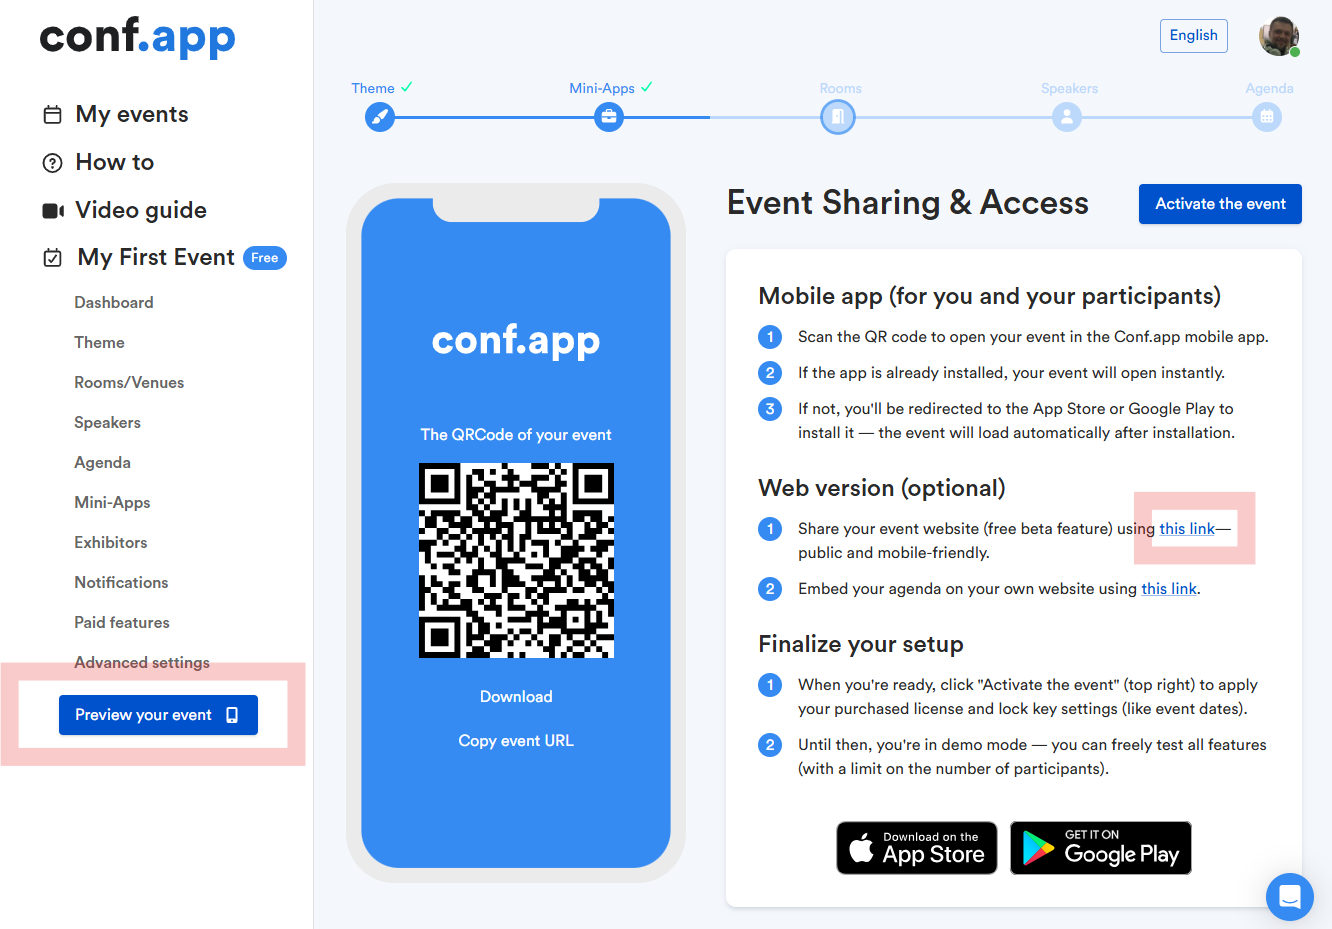
Preview Your Mini-App

Once you’ve created some items, you can preview how they look on mobile or the website by scanning the QR code or following the link on the Preview Your Event page.

UI Display Options

In the mobile app, your mini-app will always be shown as a separate widget. On the event website, however, there are three ways to display it, depending on the option you chose in the mini-app settings.

Menu Item

Widget

Front-page section

Build content with Google Doc

Google Docs can be used as a powerful tool to easily embed rich content (text and images) into your event app. The Google Doc will be embedded in “read-only” mode, meaning your participants cannot edit it but can view its content. No Google account is required to view the content.

Additionally, the final content can be embedded without any editing rights or Google Docs toolbars for a clean appearance similar to a regular webpage.

This approach can be used for displaying a list of sponsors along with their names, images, and links.

Follow these steps to proceed with the process:

  • Create a Google Doc using a Google account of your choice and configure the necessary content, including images and links.

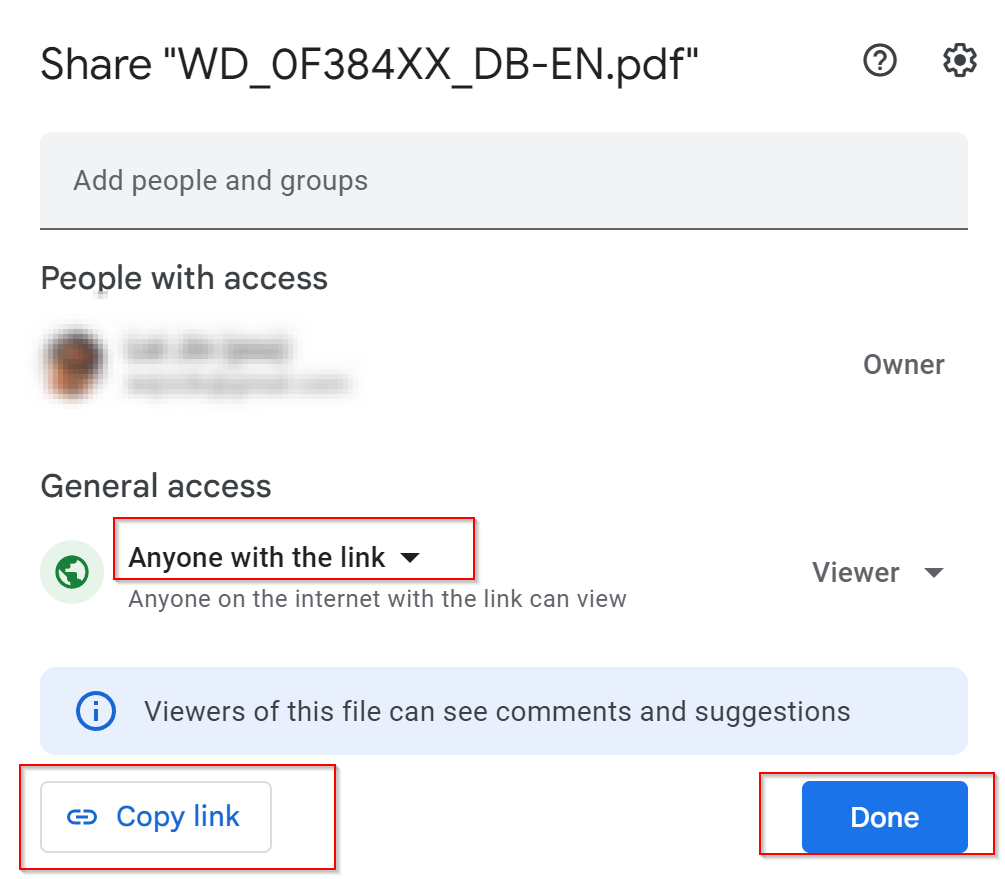
  • Click on the “Share” button within Google Docs, then change the “General access” option from “Restricted” to “Anyone with the link.” After that, click on “Copy link” and then “Done.”

  • Paste the copied link into a text editor, extract the document’s ID, and replace the “XXXXXX” in the code provided below with the ID from your Google Doc link.

				
					<iframe src="https://docs.google.com/document/d/XXXXXX/edit?usp=sharing;rm=minimal" width="100%" height="100%" frameborder="0"></iframe>				
			
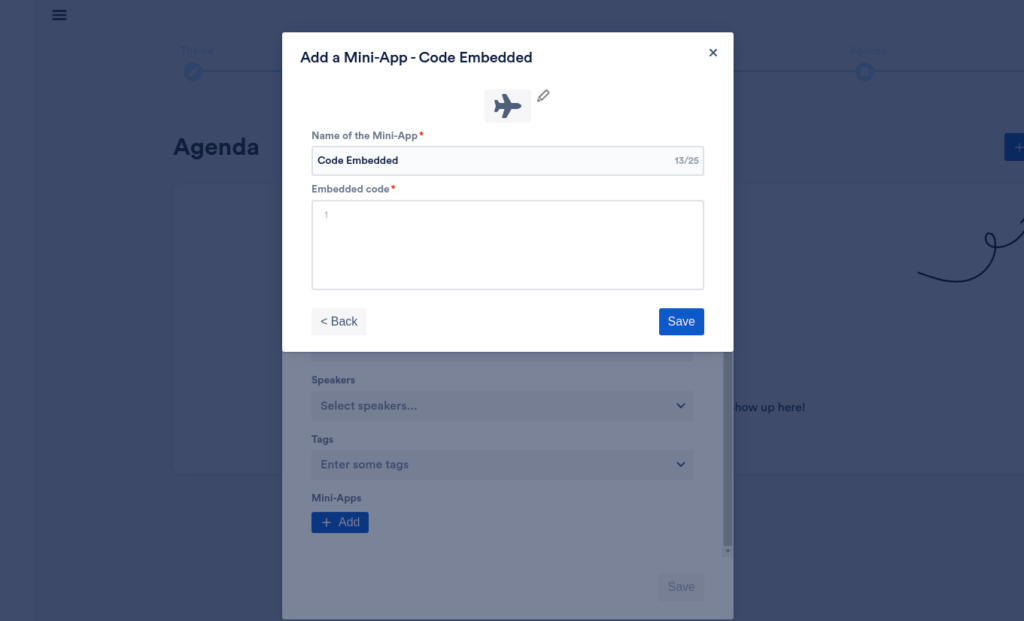
  • In your “my.conf.app” backoffice, add a “Code Embedded” miniapp and give it a suitable name. In the “Embedded code” field, paste the personalized code obtained from the previous step.

  • Save the miniapp, and then reload your confapp mobile app. You should now see the exact content you added in your Google Doc.

Check-in function

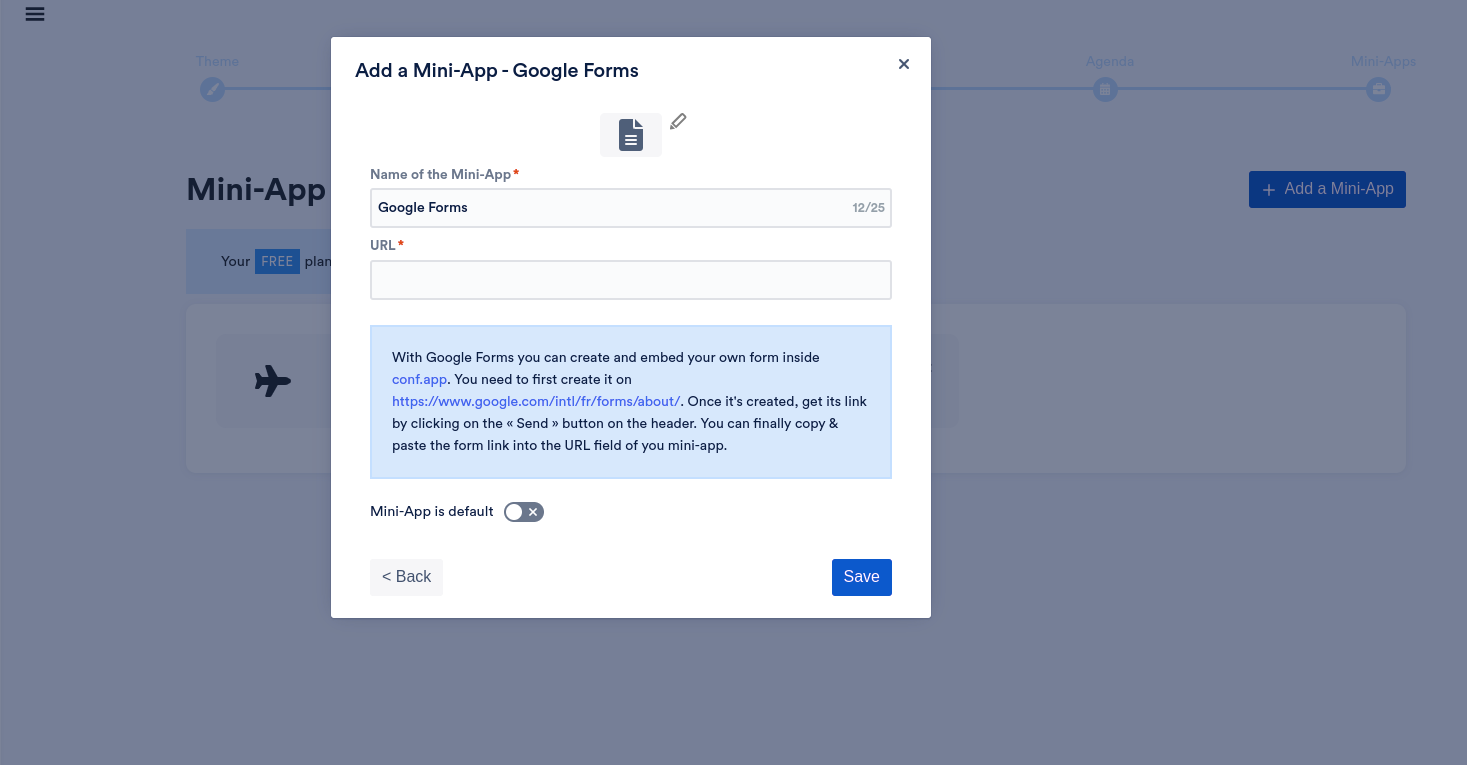
You can accomplish event check-in function through a mini-app. There are some full featured check-in tools on the market, but they would be overkill probably. For example you could use a google form to create a “check in” form, where the participant submits some check-in data and you could collect this data on the google form side. The google form could be embedded as a mini-app.

Participants Chat App

If you need to create a space where participants can chat freely. 

You can use a simple web chat tool like https://quickchat.app (or https://tlk.io)

To proceed with the process, follow these steps:

  • Create a chat channel on quickchat.app, ex: https://quickchat.app/#/666efa3c76be35841b618dee

    (replace the URL with the one you get from quickchat.app)

  • In your “my.conf.app” backoffice, add a “Web page” miniapp and give it a suitable name. In the “URL” field, paste the link https://quickchat.app/#/666efa3c76be35841b618dee

  • Save the miniapp, and then reload your confapp mobile app. You should now see the chat room appear in your mobile app, under the app icon with the name you entered above.

Photos sharing

For photos sharing, if your participants have Google accounts, Google photos shared album can be an option: https://guidebooks.google.com/iphone/photos/how-to-create-a-shared-album


Other services, like https://www.kululu.com/ (free test account available) and https://dropevent.com/ could fit your needs.

Some suggestion from https://www.thetravelteam.com/a-complete-list-of-photo-sharing-apps-for-your-next-friendcation/ might fit your needs

Downloadable documents

If you want to embed one document that the participant can read directly from the App, use the “Web page” miniapp, and put the url of the document in the URL field. This option is useful when you want to provide specific information to your audience and you don’t want to overwhelm them with too many documents.

But, if you have a long list of documents that are relevant to your topic, you can use the “Rich text” miniapp. This allows you to insert links to multiple documents and even add some descriptive text about each one. By using this option, you can provide your audience with a variety of resources and information that they can access at their own pace.

Private access

Private access enables you to secure the access to your event app by defining a password that users must provide to load your event app.

Import/Export Agenda

Conf.app enables you to export and import data for agenda in XLSX format. You can easily perform CRUD (Create, Read, Update, Delete) operations using the buttons displayed in the screenshot.

Agenda Export

To view data, use the Export button. Clicking it will download an XLSX file containing the relevant information. For editing data, we recommend using the downloaded file, which includes all the necessary columns for seamless updates.

Note: Agenda mini-apps are not included in the export. These can only be managed directly from the Conf.app dashboard.

Agenda Import

To start editing agenda using the XLSX file, we recommend creating at least one session first. Then, export the data by clicking on the Export icon and begin working with the downloaded file.
For example, let’s imagine you have already created two sessions named “Test Session 1” and “Test Session 2” with filling in all existing fields.

After exporting, the downloaded file will contain two rows, each displaying the session’s ID, Name, Description, Start and End dates, Registration Limit, Room, Tags and Speakers.

Note: Mini-apps are not included in the file, as they can only be managed through the Conf.app dashboard.

Update Session

To update any session information, simply modify the corresponding column in the XLSX file. Do not edit the “id” column — it serves as the unique identifier for an existing session.

To disable session registration, leave the cell in the registration_limit column empty. For unlimited registration, use the value -1.

The “name” field is required, so ensure this column is not left empty. You can also assign multiple speakers to a single session by using a semicolon (;) as a separator.

Mini-apps can be updated only after importing the data via the Conf.app dashboard.

Delete Session

To delete a session, simply remove the corresponding row from the XLSX file.

Create Session

To create a new session, add a new row in the XLSX file. Enter the session’s information in the corresponding columns and leave the “id” column blank.

Example

Let’s imagine we need to:
  • Rename the session “Test Session 1” to “Test Session 3”.
  • Delete the session “Test Session 2”.
  • Add a new session named “Test Session 4” without registration and with two speakers.
Following the above rules, the updated XLSX file will look like this:
Once your edits are complete, save the file and upload it using the Import button. As a result, you will see the updated agenda in Conf.app.

Import/Export Speakers

Conf.app enables you to export and import data for speakers in XLSX format. You can easily perform CRUD (Create, Read, Update, Delete) operations using the buttons displayed in the screenshot.

Speakers Export

To view data, use the Export button. Clicking it will download an XLSX file containing the relevant information. For editing data, we recommend using the downloaded file, which includes all the necessary columns for seamless updates.

Note: Speaker photo and social media details are not included in the export. These can only be managed directly from the Conf.app dashboard.

Speakers Import

To start editing speakers using the XLSX file, we recommend creating at least one speaker first. Then, export the data by clicking on the Export icon and begin working with the downloaded file.
For example, let’s imagine you have already created two speakers named “Test Speaker 1” and “Test Speaker 2.” with filling in all existing fields.

After exporting, the downloaded file will contain two rows, each displaying the speakers’s ID, Name, Position and Description.

Note: Social media data and photo are not included in the file, as they can only be managed through the Conf.app dashboard

Update Speaker

To update any speaker information, simply modify the corresponding column in the XLSX file. Do not edit the “id” column — it serves as the unique identifier for an existing speaker.
The “name” and “position” fields are required, so ensure these columns are not left empty.
Social media data and photo can be updated only after importing the data via the Conf.app dashboard.

Delete Speaker

To delete a speaker, simply remove the corresponding row from the XLSX file.

Create Speaker

To create a new speaker, add a new row in the XLSX file. Enter the speaker’s information in the corresponding columns and leave the “id” column blank.

If you’d like to add a photo and social links, you can do so after importing the data via the Conf.app dashboard.

Example

Let’s imagine we need to:
  • Rename the speaker “Test Speaker 1” to “Test Speaker 3”
  • Delete the speaker “Test Speaker 2”.
  • Add a new speaker named “Test Speaker 4”.
Following the above rules, the updated XLSX file will look like this:
Once your edits are complete, save the file and upload it using the Import button. As a result, you will see the updated list of speakers in Conf.app.

Mobile app

App Theme

Background image

You should try to match your typical target audience screen size, usually 1284 x 2778 (to match iPhone 14 Plus screen size) or 1170 x 2532 is good. The app will resize automatically the image for different other screen sizes 

Font selection

Conf.app allows you to customize the font throughout your whole app, however this won’t be applied to external tools such as Google form. You need to select a similar font in Google form if they offer this possibility.

/*! elementor - v3.21.0 - 26-05-2024 */ .elementor-widget-image{text-align:center}.elementor-widget-image a{display:inline-block}.elementor-widget-image a img[src$=".svg"]{width:48px}.elementor-widget-image img{vertical-align:middle;display:inline-block}


Live stream

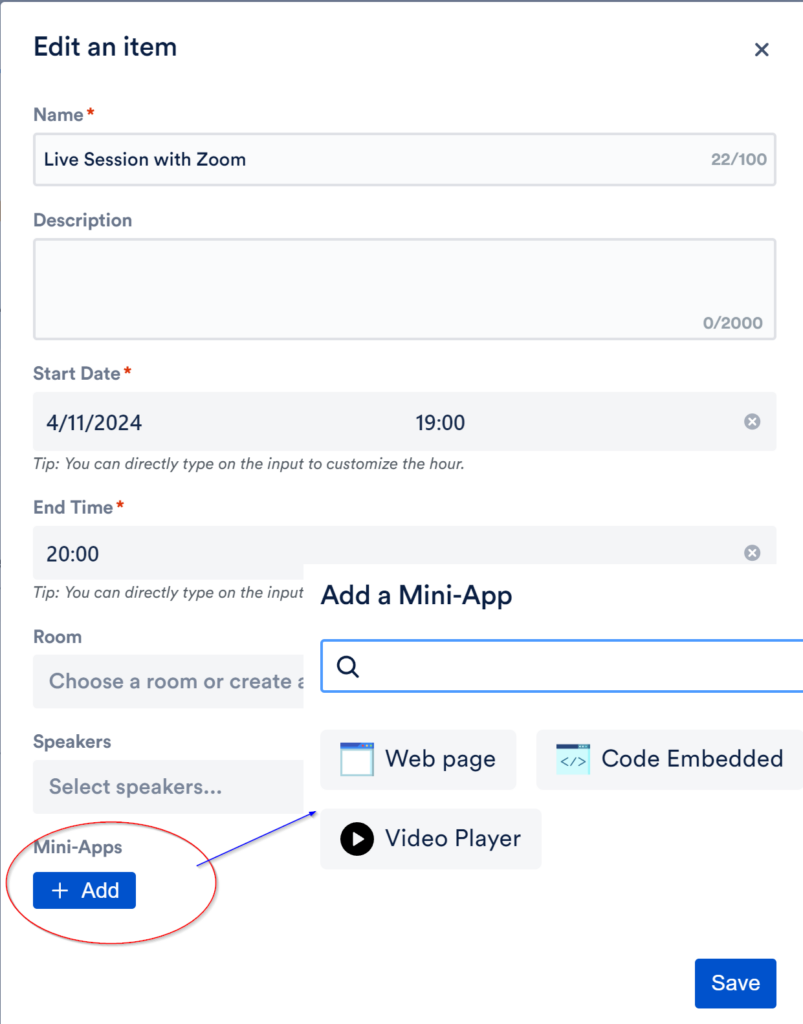
Any tool that provides an access URL or an embed code can be added to conf.app through the “Mini-apps” mechanism. When you edit an agenda entry, you can embed the js/html code from your conferencing or live streaming tool into the agenda entry. Your participants will be able to use the conferencing tool you added from their mobile app.

Just follow the instructions from zoom.us to stream the meeting to Youtube (https://support.zoom.com/hc/en/article?id=zm_kb&sysparm_article=KB0062284) or to Vimeo (https://help.vimeo.com/hc/en-us/articles/12426925043217-Stream-a-Zoom-meeting-to-Vimeo-Live) and then embed the video player code to conf.app (instructions). Then whatever you present in your desktop Zoom session would be streamed to conf.app users.

Invite attendees

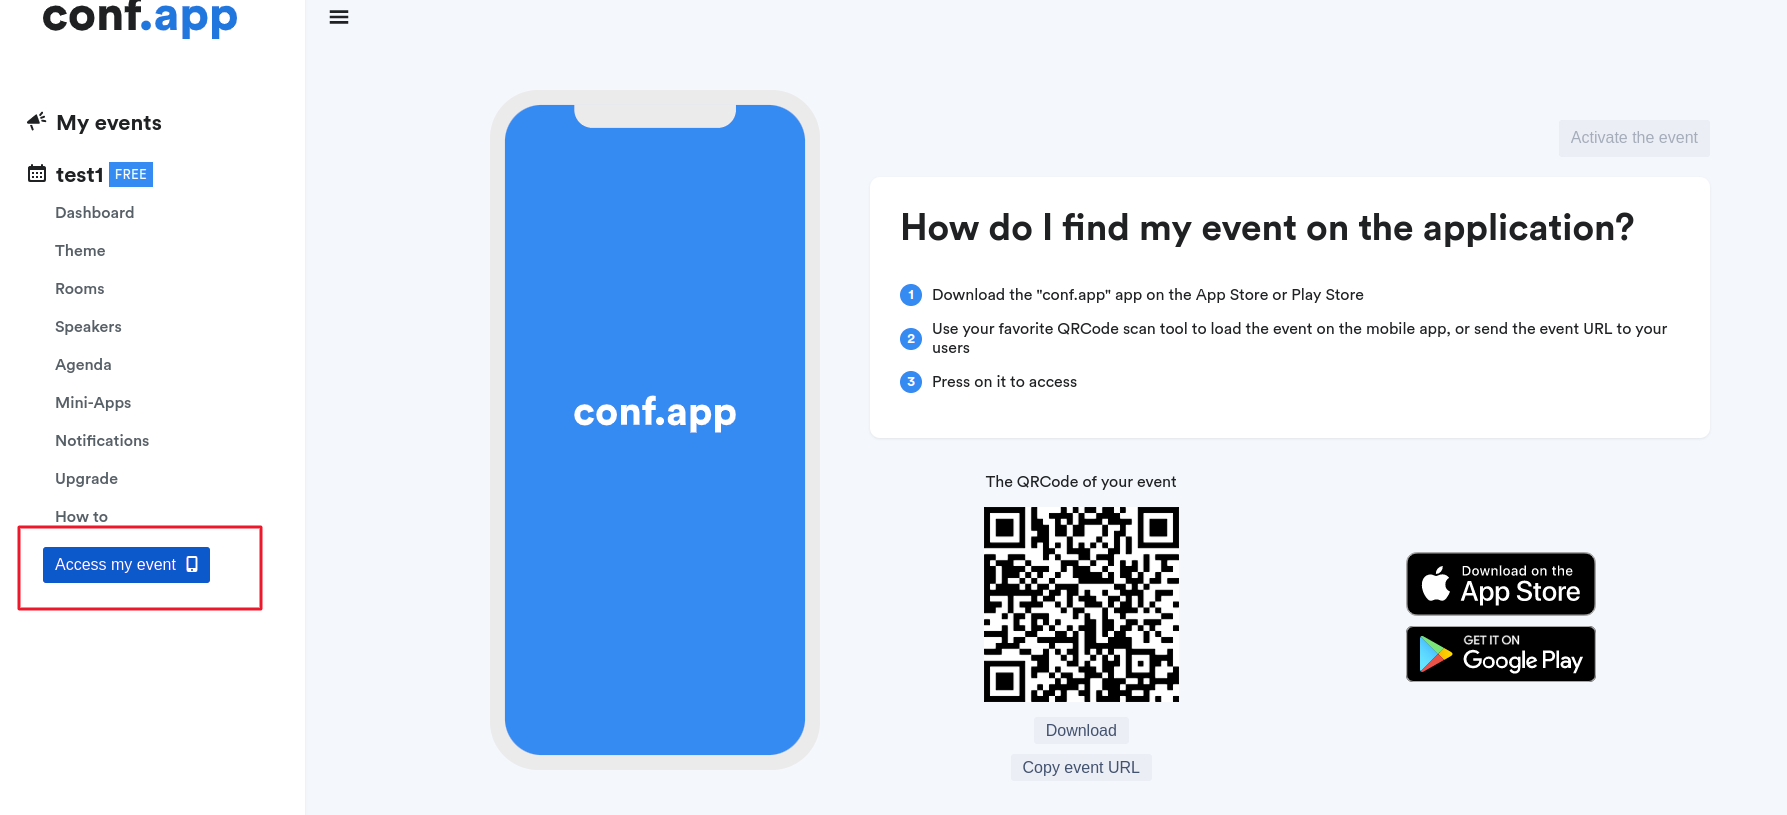
All available options can be found under the “Access My Event” menu item. However, it is not possible to send invitations directly through the platform.
You may use your own mailing tool to invite users to download the application and scan the event QR code to access it.

Track attendees

The Conf.app solution does not make it possible to identify each of the users individually within the application and to be able to follow them throughout their use. Each connecting user is anonymous. 
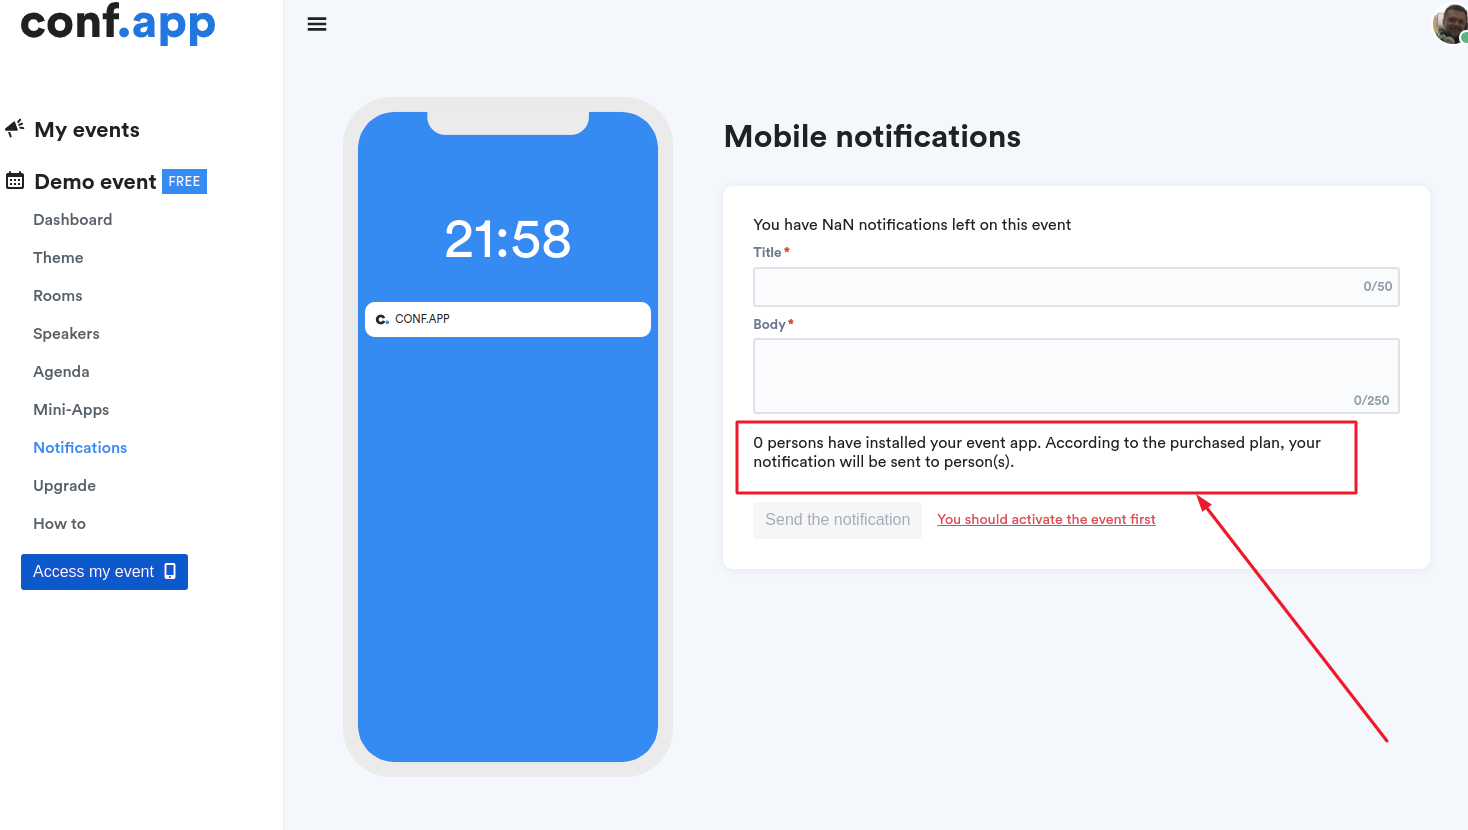
Nevertheless under the “Notifications” menu entry, you can see the number of persons who installed your app.

Sponsors & Exhibitors Setup

To showcase sponsors, exhibitors, media partners, and similar participants, you can add dedicated pages, sections, widgets, or menu items. 

This is handled by the Sponsors / Exhibitors mini-app, which you can find in the mini-apps list and add as many times as needed.

Mini-app settings

You can rename the mini-app, choose whether it should be shown separately in the mobile app or on the event website, and select how the data is displayed on the event website — as a widget, a menu item, or a section on the front page.

Managing Entries

After saving the mini-app, a menu item will appear in the left sidebar, where you can add categories and create items for your mini-app.

Preview Your Mini-App

Once you’ve created some items, you can preview how they look on mobile or the website by scanning the QR code or following the link on the Preview Your Event page.

UI Display Options

In the mobile app, your mini-app will always be shown as a separate widget. On the event website, however, there are three ways to display it, depending on the option you chose in the mini-app settings.

Menu Item

Widget

Front-page section

Import/Export Rooms

Conf.app enables you to export and import data for rooms in XLSX format. You can easily perform CRUD (Create, Read, Update, Delete) operations using the buttons displayed in the screenshot.

Rooms Export

To view data, use the Export button. Clicking it will download an XLSX file containing the relevant information. For editing data, we recommend using the downloaded file, which includes all the necessary columns for seamless updates.

Rooms Import

To start editing rooms using the XLSX file, we recommend creating at least one room first. Then, export the data by clicking on the Export icon and begin working with the downloaded file.

For example, let’s imagine you have already created two rooms named “Test Room 1” and “Test Room 2”. After exporting, the downloaded file will contain two rows, each displaying the room’s ID and Name.

Update Room

To rename a room, simply update the “name” column in the XLSX file with the desired new name. Do not edit the “id” column field value.

Delete Room

To delete a room, simply remove the corresponding row from the XLSX file.

Create Room

To create a new room, add a new row in the XLSX file. Write the room’s name in the corresponding “name“ column and leave the “id” column blank.

Example

Let’s imagine we need to:
  • Rename the room “Test Room 1” to “Test Room 3”.
  • Delete the room “Test Room 2”.
  • Add a new room named “Test Room 4”.
Following the above rules, the updated XLSX file will look like this:
Once your edits are complete, save the file and upload it using the Import button. As a result, you will see the updated list of rooms in Conf.app.

Rooms / Venues

The Room tool is designed to configure venues, physical rooms, or any location where the presentations/activities for your event occur. They offer you the possibility to associate your event agenda entries with different locations.

Documentation

Getting Started

Conf.app goes beyond the classic video conference tools. It’s designed to create an app where you can build an agenda for a single day or multiple days event, and where each entry of the agenda can embed a link or the video player of a virtual event. You can actually embed anything you need, many of our customers would use google doc to create practical information pages, google form to collect some data, google maps to indicate the event location for example. You could also include links to various tools like whatsapp, sli.do etc.
Product tour

To get a general idea of the app creation process, you can watch our product tour. To access this functionality, simply enter one of your events and click on the “Replay product tour” button.

Also you can check out tutorial videos on our YouTube channel or watch the video guide using the link below.

Roles and Permissions

Each event has the following possible roles:

Who is the Owner?

The Owner is always the person who created the event. This role cannot be transferred or assigned, except with the help of the support team.

Can roles be changed later?

The Owner or Administrators can delete the role of invited users at any time, and create a new one except that no one can become the Owner.

Can a role be assigned to an unregistered user?

No. Roles can only be assigned to users who are already registered in conf.app. If the email is not registered, the user must first create an account before a role can be assigned.

Can I add a new permission or create a new role?

Yes, but only by request to the support team. Requests must include the purpose and details so the team can review and approve the change in line with event management policies.

Demo app

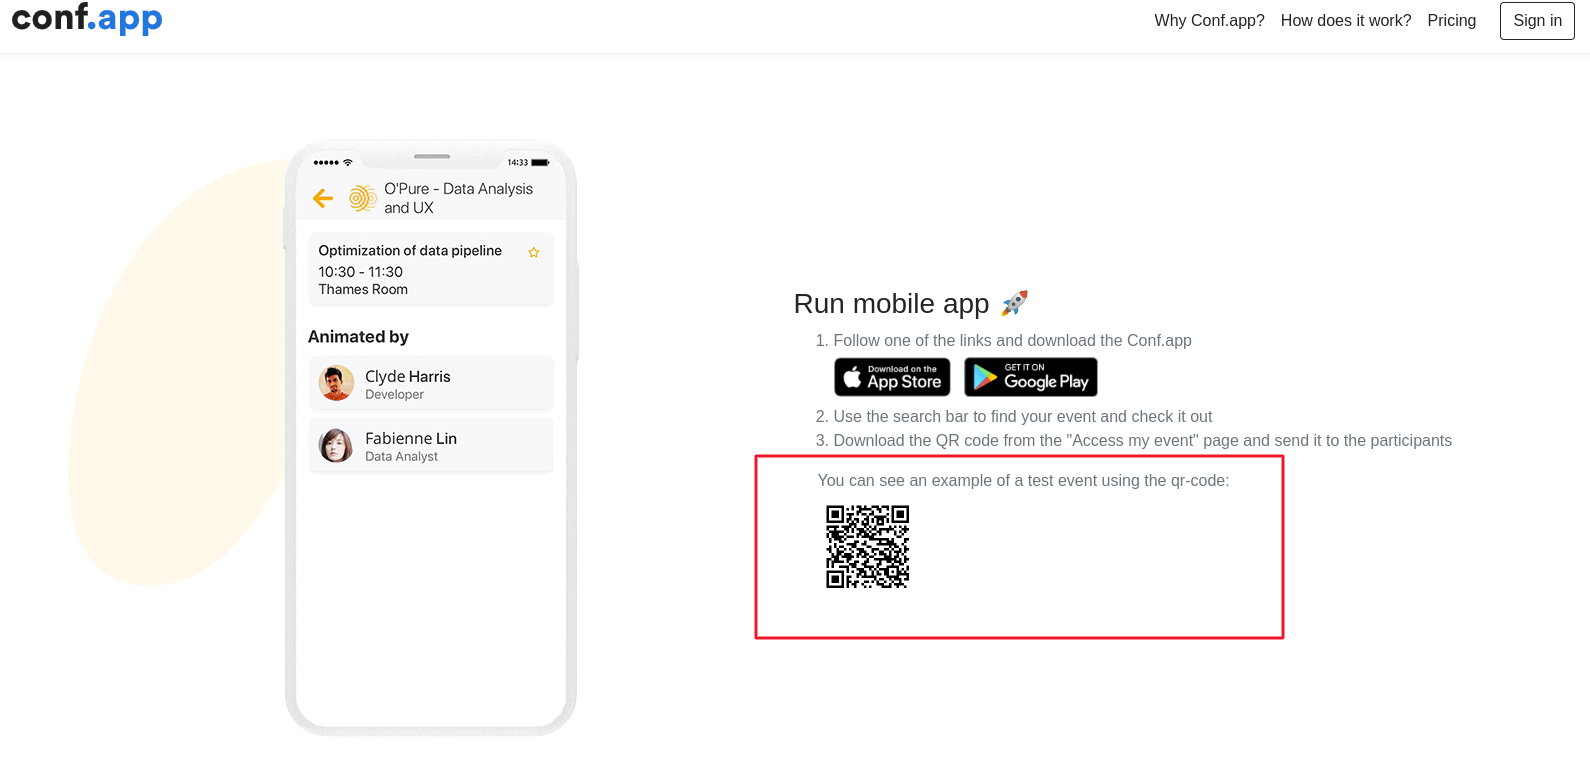
You can find a demo app QR code on conf.app website

Scan the QR code below to experience a sample event application developed with Conf.app. Please keep in mind that Conf.app offers an open architecture through its “Mini-apps” mechanism, allowing you to effortlessly customize and enrich the event application with your own resources.

Set up an event

Timezone

You can easily change the timezone of your event in our app. Go to the Dashboard page of your event, click the edit icon, and select your timezone from the dropdown that appears.

By default, your participants will see the agenda entries with the time defined for your configured timezone. They can also, if they prefer, automatically convert all the displayed time to their local timezone through the Conf.app settings menu.

Private access

Private access enables you to secure the access to your event app by defining a password that users must provide to load your event app.

Import/Export Agenda

Conf.app enables you to export and import data for agenda in XLSX format. You can easily perform CRUD (Create, Read, Update, Delete) operations using the buttons displayed in the screenshot.

Agenda Export

To view data, use the Export button. Clicking it will download an XLSX file containing the relevant information. For editing data, we recommend using the downloaded file, which includes all the necessary columns for seamless updates.

Note: Agenda mini-apps are not included in the export. These can only be managed directly from the Conf.app dashboard.

Agenda Import

To start editing agenda using the XLSX file, we recommend creating at least one session first. Then, export the data by clicking on the Export icon and begin working with the downloaded file.
For example, let’s imagine you have already created two sessions named “Test Session 1” and “Test Session 2” with filling in all existing fields.

After exporting, the downloaded file will contain two rows, each displaying the session’s ID, Name, Description, Start and End dates, Registration Limit, Room, Tags and Speakers.

Note: Mini-apps are not included in the file, as they can only be managed through the Conf.app dashboard.

Update Session

To update any session information, simply modify the corresponding column in the XLSX file. Do not edit the “id” column — it serves as the unique identifier for an existing session.

To disable session registration, leave the cell in the registration_limit column empty. For unlimited registration, use the value -1.

The “name” field is required, so ensure this column is not left empty. You can also assign multiple speakers to a single session by using a semicolon (;) as a separator.

Mini-apps can be updated only after importing the data via the Conf.app dashboard.

Delete Session

To delete a session, simply remove the corresponding row from the XLSX file.

Create Session

To create a new session, add a new row in the XLSX file. Enter the session’s information in the corresponding columns and leave the “id” column blank.

Example

Let’s imagine we need to:
  • Rename the session “Test Session 1” to “Test Session 3”.
  • Delete the session “Test Session 2”.
  • Add a new session named “Test Session 4” without registration and with two speakers.
Following the above rules, the updated XLSX file will look like this:
Once your edits are complete, save the file and upload it using the Import button. As a result, you will see the updated agenda in Conf.app.

Import/Export Speakers

Conf.app enables you to export and import data for speakers in XLSX format. You can easily perform CRUD (Create, Read, Update, Delete) operations using the buttons displayed in the screenshot.

Speakers Export

To view data, use the Export button. Clicking it will download an XLSX file containing the relevant information. For editing data, we recommend using the downloaded file, which includes all the necessary columns for seamless updates.

Note: Speaker photo and social media details are not included in the export. These can only be managed directly from the Conf.app dashboard.

Speakers Import

To start editing speakers using the XLSX file, we recommend creating at least one speaker first. Then, export the data by clicking on the Export icon and begin working with the downloaded file.
For example, let’s imagine you have already created two speakers named “Test Speaker 1” and “Test Speaker 2.” with filling in all existing fields.

After exporting, the downloaded file will contain two rows, each displaying the speakers’s ID, Name, Position and Description.

Note: Social media data and photo are not included in the file, as they can only be managed through the Conf.app dashboard

Update Speaker

To update any speaker information, simply modify the corresponding column in the XLSX file. Do not edit the “id” column — it serves as the unique identifier for an existing speaker.
The “name” and “position” fields are required, so ensure these columns are not left empty.
Social media data and photo can be updated only after importing the data via the Conf.app dashboard.

Delete Speaker

To delete a speaker, simply remove the corresponding row from the XLSX file.

Create Speaker

To create a new speaker, add a new row in the XLSX file. Enter the speaker’s information in the corresponding columns and leave the “id” column blank.

If you’d like to add a photo and social links, you can do so after importing the data via the Conf.app dashboard.

Example

Let’s imagine we need to:
  • Rename the speaker “Test Speaker 1” to “Test Speaker 3”
  • Delete the speaker “Test Speaker 2”.
  • Add a new speaker named “Test Speaker 4”.
Following the above rules, the updated XLSX file will look like this:
Once your edits are complete, save the file and upload it using the Import button. As a result, you will see the updated list of speakers in Conf.app.

Import/Export Rooms

Conf.app enables you to export and import data for rooms in XLSX format. You can easily perform CRUD (Create, Read, Update, Delete) operations using the buttons displayed in the screenshot.

Rooms Export

To view data, use the Export button. Clicking it will download an XLSX file containing the relevant information. For editing data, we recommend using the downloaded file, which includes all the necessary columns for seamless updates.

Rooms Import

To start editing rooms using the XLSX file, we recommend creating at least one room first. Then, export the data by clicking on the Export icon and begin working with the downloaded file.

For example, let’s imagine you have already created two rooms named “Test Room 1” and “Test Room 2”. After exporting, the downloaded file will contain two rows, each displaying the room’s ID and Name.

Update Room

To rename a room, simply update the “name” column in the XLSX file with the desired new name. Do not edit the “id” column field value.

Delete Room

To delete a room, simply remove the corresponding row from the XLSX file.

Create Room

To create a new room, add a new row in the XLSX file. Write the room’s name in the corresponding “name“ column and leave the “id” column blank.

Example

Let’s imagine we need to:
  • Rename the room “Test Room 1” to “Test Room 3”.
  • Delete the room “Test Room 2”.
  • Add a new room named “Test Room 4”.
Following the above rules, the updated XLSX file will look like this:
Once your edits are complete, save the file and upload it using the Import button. As a result, you will see the updated list of rooms in Conf.app.

Rooms / Venues

The Room tool is designed to configure venues, physical rooms, or any location where the presentations/activities for your event occur. They offer you the possibility to associate your event agenda entries with different locations.

Sponsors

There is way to add graphics like a sponsors logo to the agenda pages. On each agenda page, you can embed a mini-app, which can use any web page URL as a source. You can create some sponsor pages in an external website and embed them here.

See more details on how to embed a Google doc content, in “read-only” mode, see this page

Tradeshow participants

To add a downloadable PDF that contains the trade show participants with their logos and links to their websites, you can follow these steps to host the document.

  • You can create a PDF with the content you need and upload the PDF to your Google drive.

  • Allow access to anyone

  • Get the "share URL" of this PDF from Google drive and add it to your app event with the "Web page" mini-app.

Agenda

Time format

You can set the app program times to AM and PM instead of military hours.

Embedded agenda

Our service enables you to create and embed a program for your event directly on your website using the following link:

https://agenda.conf.app/{eventId}

where {eventId} is the unique identifier for your event that can be found in dashboard url.

To embed your agenda on a website, use this code:
<iframe src="https://agenda.conf.app/{eventId}" height="100%" width="100%" style="border: none;"></iframe>
To see an example of how it will look, visit:

https://agenda.conf.app/244d8501-023e-4bdc-af1f-a581c01d84ec

Customization Options

We offer several options to customize the look of the program.
Hide Header
By default, the agenda view includes a header with the logo, date, and event description. To hide this header, add the following parameter to the URL:
?header=false
Example:

https://agenda.conf.app/244d8501-023e-4bdc-af1f-a581c01d84ec?header=false

Change Language

By default, the agenda view is displayed in English. To change the language, add the following parameter to the agenda URL:

?lang=de

Available languages are: en (English), de (German), it (Italian), zh (Chinese), pt (Portuguese), sp (Spanish), fr (French).

Example:

https://agenda.conf.app/244d8501-023e-4bdc-af1f-a581c01d84ec?lang=de

Change Timezone
By default, the agenda dates are shown in the event’s timezone. To change the timezone to the user’s local one, add the following parameter to the agenda URL:
?local_timezone=true
Change Time format
By default, the agenda time is shown in 12-hour format (with AM/PM). To switch to 24-hour format, add the following parameter to the agenda URL:
?24_hour_time=true

Sample code: Embed a Spanish agenda without header, using local timezone and 24-hour format

<iframe style="border: none;" src="https://agenda.conf.app/244d8501-023e-4bdc-af1f-a581c01d84ec?lang=es&header=false&local_timezone=true&24_hour_time=true" width="100%" height="100%"></iframe>

Session time

Conf.app’s agenda builder offers convenient access to time intervals in 30-minute increments.

However, if your agenda entry’s time isn’t divisible by 30 minutes, you can input it manually. Remember to use the 24-hour format. For example, for 1:20 PM, type 13:20 instead.

To input manually, click on the time field and begin typing to edit the default content.

Miniapp for agenda entries

It is possible to enhance each of your event’s agenda entries with rich and contextual tools. For example, you can add live meeting streaming video, and you could also add live question/polling tools such as Slido directly to the session page.

Mini-Apps

Sponsors & Exhibitors Setup

To showcase sponsors, exhibitors, media partners, and similar participants, you can add dedicated pages, sections, widgets, or menu items. 

This is handled by the Sponsors / Exhibitors mini-app, which you can find in the mini-apps list and add as many times as needed.

Mini-app settings

You can rename the mini-app, choose whether it should be shown separately in the mobile app or on the event website, and select how the data is displayed on the event website — as a widget, a menu item, or a section on the front page.

Managing Entries

After saving the mini-app, a menu item will appear in the left sidebar, where you can add categories and create items for your mini-app.

Preview Your Mini-App

Once you’ve created some items, you can preview how they look on mobile or the website by scanning the QR code or following the link on the Preview Your Event page.

UI Display Options

In the mobile app, your mini-app will always be shown as a separate widget. On the event website, however, there are three ways to display it, depending on the option you chose in the mini-app settings.

Menu Item

Widget

Front-page section

Build content with Google Doc

Google Docs can be used as a powerful tool to easily embed rich content (text and images) into your event app. The Google Doc will be embedded in “read-only” mode, meaning your participants cannot edit it but can view its content. No Google account is required to view the content.

Additionally, the final content can be embedded without any editing rights or Google Docs toolbars for a clean appearance similar to a regular webpage.

This approach can be used for displaying a list of sponsors along with their names, images, and links.

Follow these steps to proceed with the process:

  • Create a Google Doc using a Google account of your choice and configure the necessary content, including images and links.

  • Click on the “Share” button within Google Docs, then change the “General access” option from “Restricted” to “Anyone with the link.” After that, click on “Copy link” and then “Done.”

  • Paste the copied link into a text editor, extract the document’s ID, and replace the “XXXXXX” in the code provided below with the ID from your Google Doc link.

				
					<iframe src="https://docs.google.com/document/d/XXXXXX/edit?usp=sharing;rm=minimal" width="100%" height="100%" frameborder="0"></iframe>				
			
  • In your “my.conf.app” backoffice, add a “Code Embedded” miniapp and give it a suitable name. In the “Embedded code” field, paste the personalized code obtained from the previous step.

  • Save the miniapp, and then reload your confapp mobile app. You should now see the exact content you added in your Google Doc.

Check-in function

You can accomplish event check-in function through a mini-app. There are some full featured check-in tools on the market, but they would be overkill probably. For example you could use a google form to create a “check in” form, where the participant submits some check-in data and you could collect this data on the google form side. The google form could be embedded as a mini-app.

Participants Chat App

If you need to create a space where participants can chat freely. 

You can use a simple web chat tool like https://quickchat.app (or https://tlk.io)

To proceed with the process, follow these steps:

  • Create a chat channel on quickchat.app, ex: https://quickchat.app/#/666efa3c76be35841b618dee

    (replace the URL with the one you get from quickchat.app)

  • In your “my.conf.app” backoffice, add a “Web page” miniapp and give it a suitable name. In the “URL” field, paste the link https://quickchat.app/#/666efa3c76be35841b618dee

  • Save the miniapp, and then reload your confapp mobile app. You should now see the chat room appear in your mobile app, under the app icon with the name you entered above.

Photos sharing

For photos sharing, if your participants have Google accounts, Google photos shared album can be an option: https://guidebooks.google.com/iphone/photos/how-to-create-a-shared-album


Other services, like https://www.kululu.com/ (free test account available) and https://dropevent.com/ could fit your needs.

Some suggestion from https://www.thetravelteam.com/a-complete-list-of-photo-sharing-apps-for-your-next-friendcation/ might fit your needs

Downloadable documents

If you want to embed one document that the participant can read directly from the App, use the “Web page” miniapp, and put the url of the document in the URL field. This option is useful when you want to provide specific information to your audience and you don’t want to overwhelm them with too many documents.

But, if you have a long list of documents that are relevant to your topic, you can use the “Rich text” miniapp. This allows you to insert links to multiple documents and even add some descriptive text about each one. By using this option, you can provide your audience with a variety of resources and information that they can access at their own pace.

Mobile app

App Theme

Background image

You should try to match your typical target audience screen size, usually 1284 x 2778 (to match iPhone 14 Plus screen size) or 1170 x 2532 is good. The app will resize automatically the image for different other screen sizes 

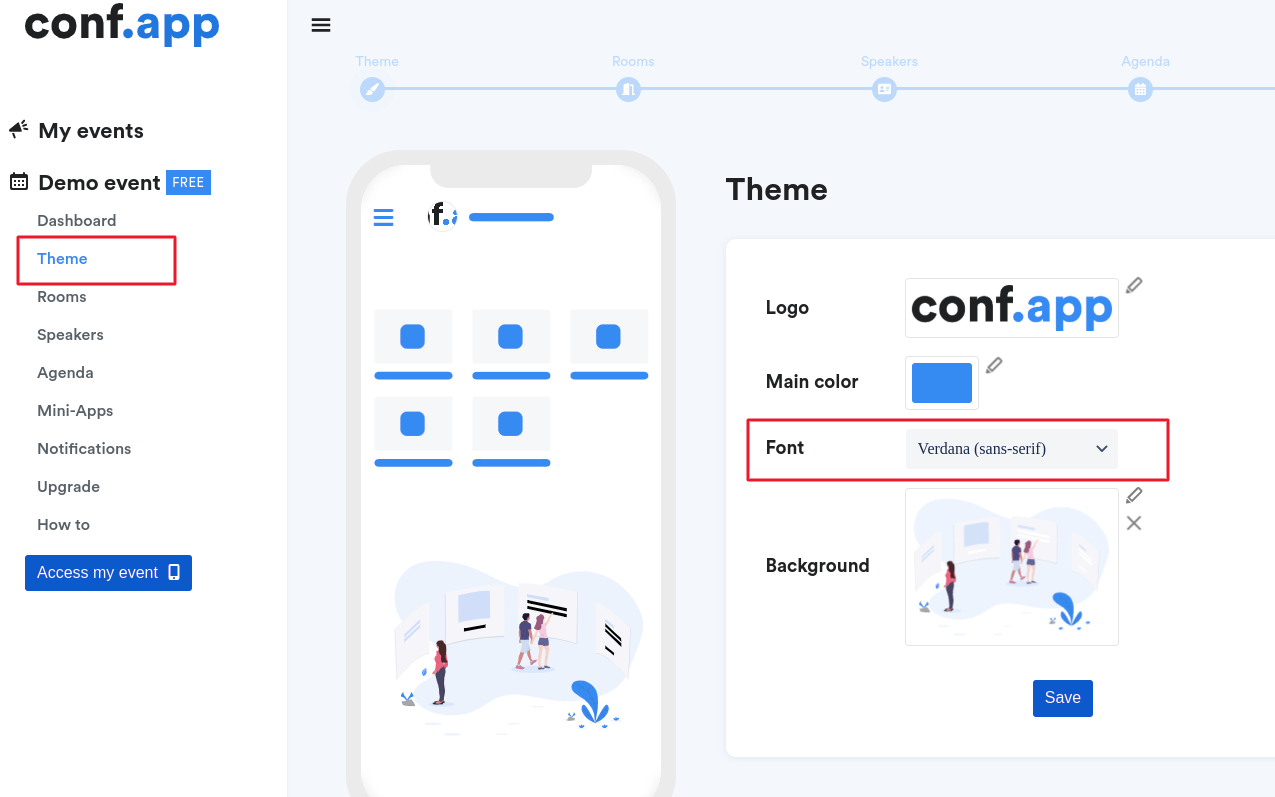
Font selection

Conf.app allows you to customize the font throughout your whole app, however this won’t be applied to external tools such as Google form. You need to select a similar font in Google form if they offer this possibility.

/*! elementor - v3.21.0 - 26-05-2024 */ .elementor-widget-image{text-align:center}.elementor-widget-image a{display:inline-block}.elementor-widget-image a img[src$=".svg"]{width:48px}.elementor-widget-image img{vertical-align:middle;display:inline-block}
Live stream

Any tool that provides an access URL or an embed code can be added to conf.app through the “Mini-apps” mechanism. When you edit an agenda entry, you can embed the js/html code from your conferencing or live streaming tool into the agenda entry. Your participants will be able to use the conferencing tool you added from their mobile app.

Just follow the instructions from zoom.us to stream the meeting to Youtube (https://support.zoom.com/hc/en/article?id=zm_kb&sysparm_article=KB0062284) or to Vimeo (https://help.vimeo.com/hc/en-us/articles/12426925043217-Stream-a-Zoom-meeting-to-Vimeo-Live) and then embed the video player code to conf.app (instructions). Then whatever you present in your desktop Zoom session would be streamed to conf.app users.

Invite attendees

All available options can be found under the “Access My Event” menu item. However, it is not possible to send invitations directly through the platform.
You may use your own mailing tool to invite users to download the application and scan the event QR code to access it.

Track attendees

The Conf.app solution does not make it possible to identify each of the users individually within the application and to be able to follow them throughout their use. Each connecting user is anonymous. 
Nevertheless under the “Notifications” menu entry, you can see the number of persons who installed your app.

Payments

Free plan

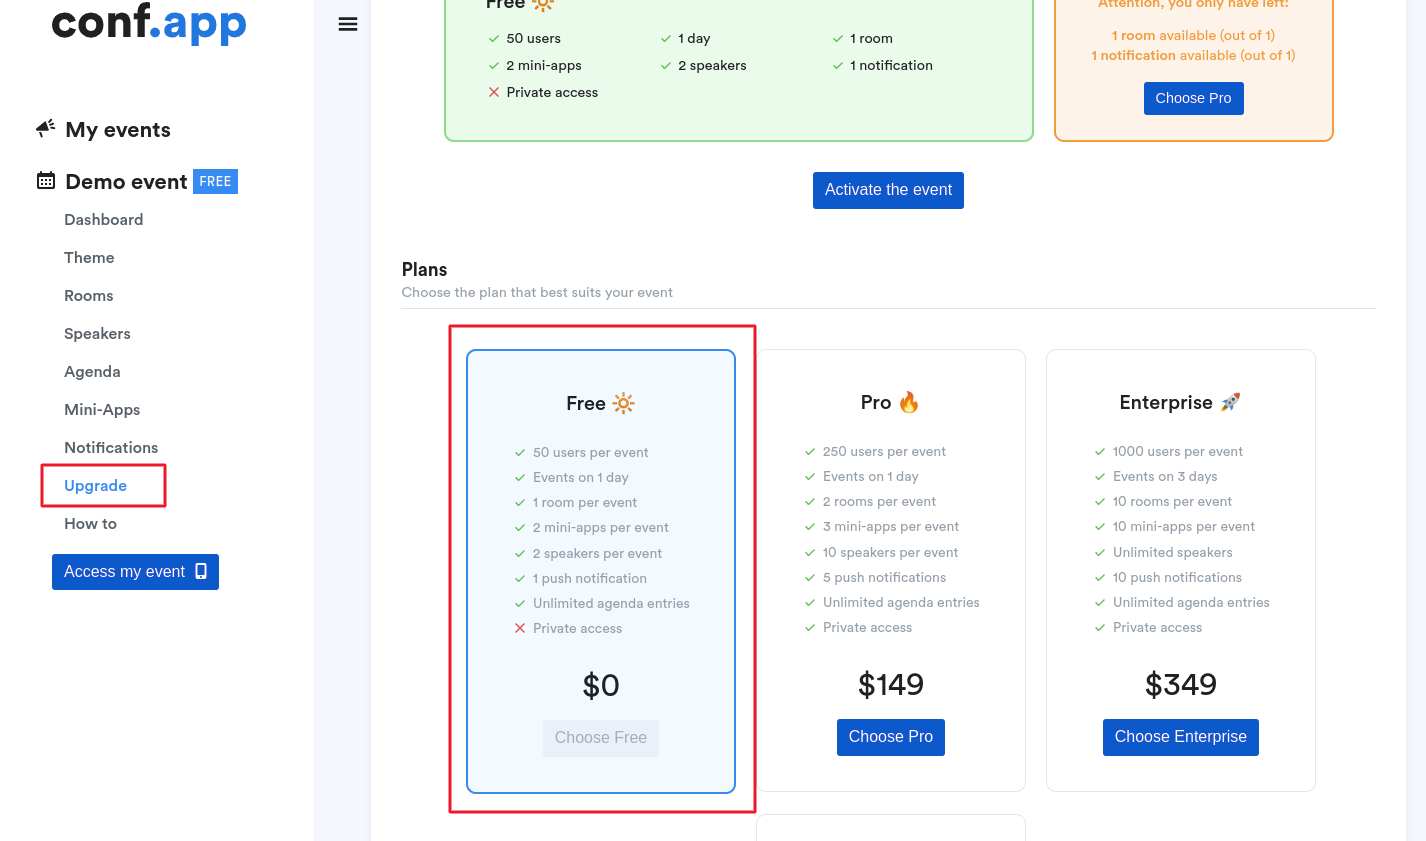
By default, your event is on the ‘Free’ plan.

You can utilize all features available in the free plan without any restrictions, even for business events.

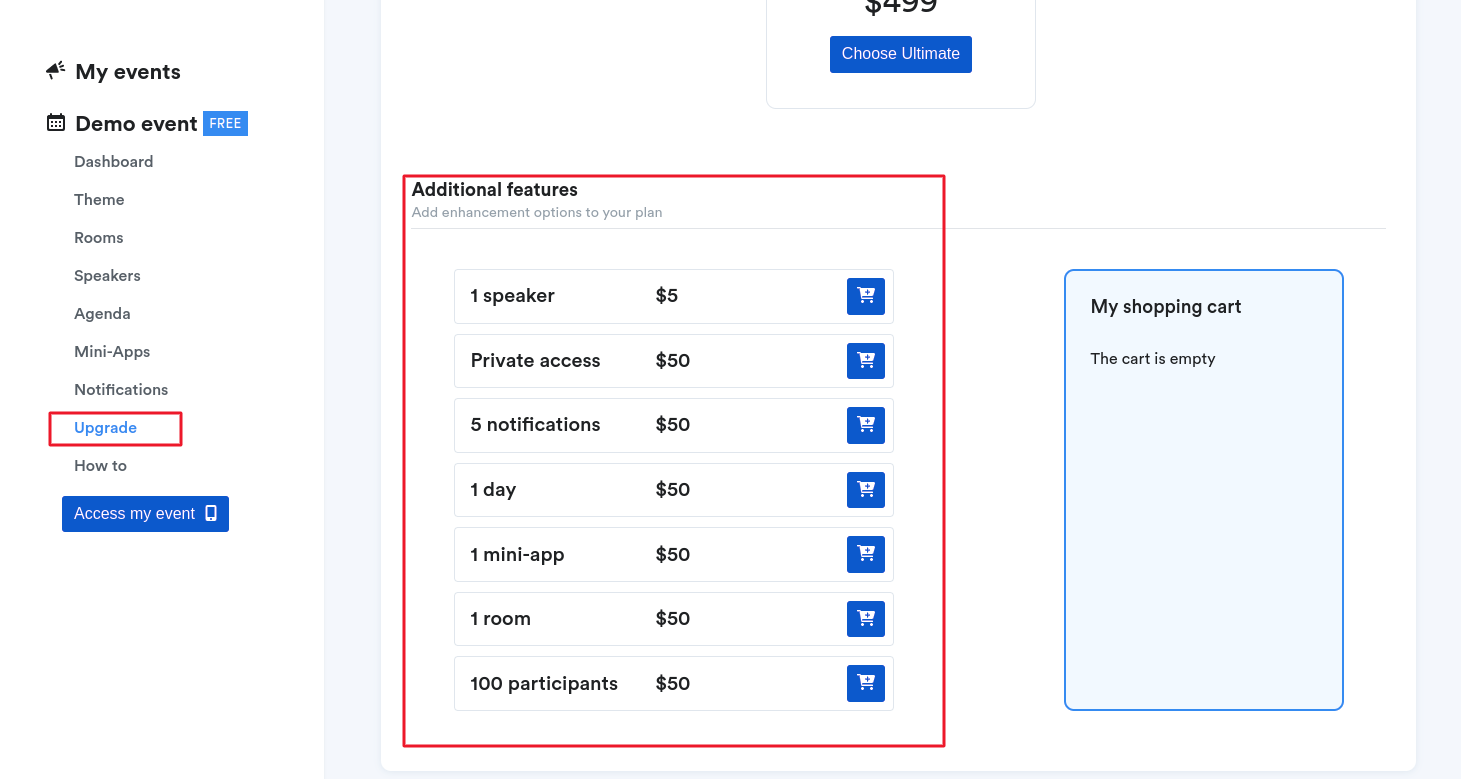
If your event requires additional features such as more mini-apps or increased participant capacity, all paid options are listed on the Upgrade page.

Please note that until you ‘activate’ your event, you can test all features without limitations, except for the mobile app, which can only be tested by a maximum of 5 testers. We encourage you to utilize the ‘non-activated’ mode to set up your event app and activate it only when everything is ready. During the activation process, you will be reminded of any additional options you may need to purchase.

Billing info

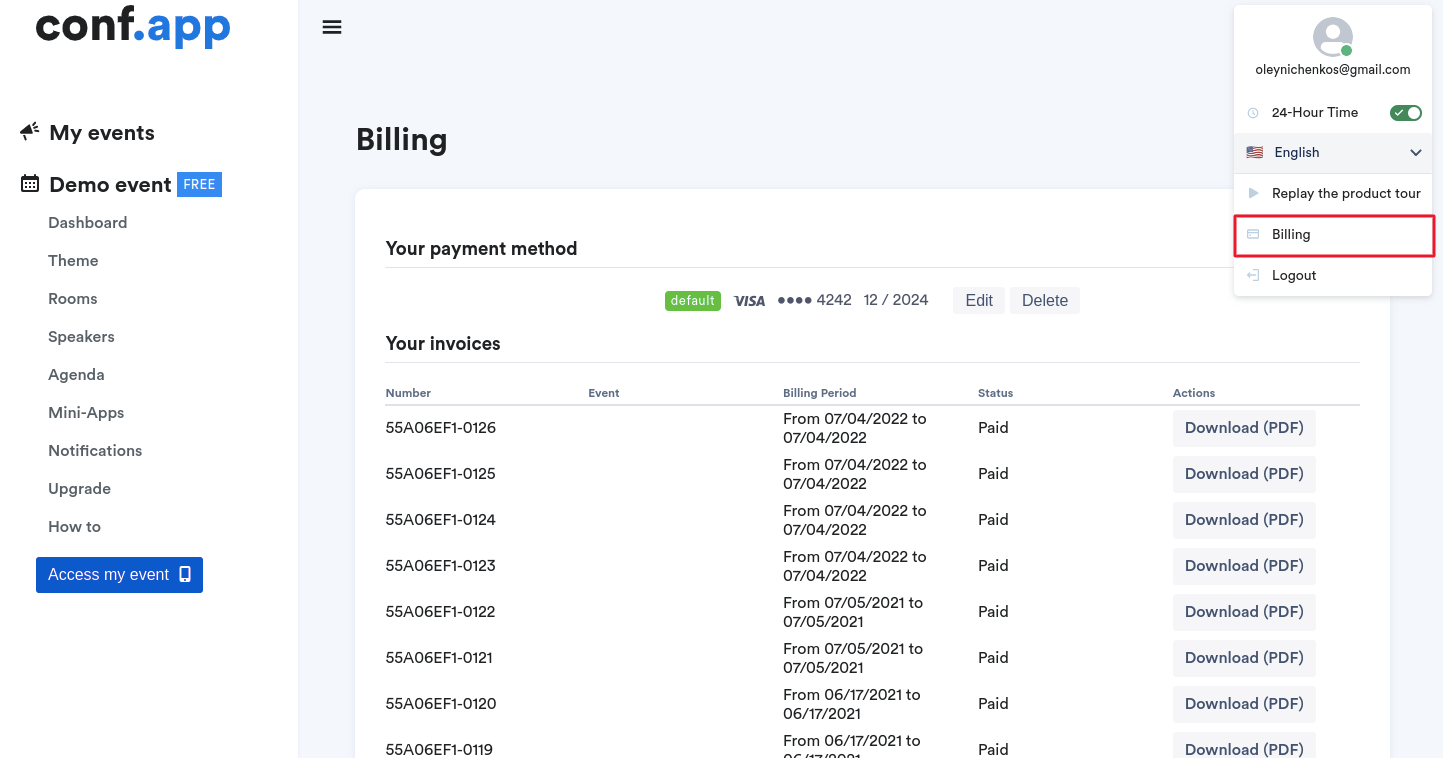
You can manage your billing information by adding, editing, or deleting it on the billing page. You can access the billing page by clicking on your user avatar at the top right corner.

Additional features

Every plan you choose can be enhanced with additional features.

Sponsors

There is way to add graphics like a sponsors logo to the agenda pages. On each agenda page, you can embed a mini-app, which can use any web page URL as a source. You can create some sponsor pages in an external website and embed them here.

See more details on how to embed a Google doc content, in “read-only” mode, see this page

Payments

Free plan

By default, your event is on the ‘Free’ plan.

You can utilize all features available in the free plan without any restrictions, even for business events.

If your event requires additional features such as more mini-apps or increased participant capacity, all paid options are listed on the Upgrade page.

Please note that until you ‘activate’ your event, you can test all features without limitations, except for the mobile app, which can only be tested by a maximum of 5 testers. We encourage you to utilize the ‘non-activated’ mode to set up your event app and activate it only when everything is ready. During the activation process, you will be reminded of any additional options you may need to purchase.

Billing info

You can manage your billing information by adding, editing, or deleting it on the billing page. You can access the billing page by clicking on your user avatar at the top right corner.

Additional features

Every plan you choose can be enhanced with additional features.

Tradeshow participants

To add a downloadable PDF that contains the trade show participants with their logos and links to their websites, you can follow these steps to host the document.

  • You can create a PDF with the content you need and upload the PDF to your Google drive.

  • Allow access to anyone

  • Get the "share URL" of this PDF from Google drive and add it to your app event with the "Web page" mini-app.

Time format

You can set the app program times to AM and PM instead of military hours.

Embedded agenda

Our service enables you to create and embed a program for your event directly on your website using the following link:

https://agenda.conf.app/{eventId}

where {eventId} is the unique identifier for your event that can be found in dashboard url.

To embed your agenda on a website, use this code:
<iframe src="https://agenda.conf.app/{eventId}" height="100%" width="100%" style="border: none;"></iframe>
To see an example of how it will look, visit:

https://agenda.conf.app/244d8501-023e-4bdc-af1f-a581c01d84ec

Customization Options

We offer several options to customize the look of the program.
Hide Header
By default, the agenda view includes a header with the logo, date, and event description. To hide this header, add the following parameter to the URL:
?header=false
Example:

https://agenda.conf.app/244d8501-023e-4bdc-af1f-a581c01d84ec?header=false

Change Language

By default, the agenda view is displayed in English. To change the language, add the following parameter to the agenda URL:

?lang=de

Available languages are: en (English), de (German), it (Italian), zh (Chinese), pt (Portuguese), sp (Spanish), fr (French).

Example:

https://agenda.conf.app/244d8501-023e-4bdc-af1f-a581c01d84ec?lang=de

Change Timezone
By default, the agenda dates are shown in the event’s timezone. To change the timezone to the user’s local one, add the following parameter to the agenda URL:
?local_timezone=true
Change Time format
By default, the agenda time is shown in 12-hour format (with AM/PM). To switch to 24-hour format, add the following parameter to the agenda URL:
?24_hour_time=true

Sample code: Embed a Spanish agenda without header, using local timezone and 24-hour format

<iframe style="border: none;" src="https://agenda.conf.app/244d8501-023e-4bdc-af1f-a581c01d84ec?lang=es&header=false&local_timezone=true&24_hour_time=true" width="100%" height="100%"></iframe>

Session time

Conf.app’s agenda builder offers convenient access to time intervals in 30-minute increments.

However, if your agenda entry’s time isn’t divisible by 30 minutes, you can input it manually. Remember to use the 24-hour format. For example, for 1:20 PM, type 13:20 instead.

To input manually, click on the time field and begin typing to edit the default content.

Miniapp for agenda entries

It is possible to enhance each of your event’s agenda entries with rich and contextual tools. For example, you can add live meeting streaming video, and you could also add live question/polling tools such as Slido directly to the session page.

Build content with Google Doc

Google Docs can be used as a powerful tool to easily embed rich content (text and images) into your event app. The Google Doc will be embedded in “read-only” mode, meaning your participants cannot edit it but can view its content. No Google account is required to view the content.

Additionally, the final content can be embedded without any editing rights or Google Docs toolbars for a clean appearance similar to a regular webpage.

This approach can be used for displaying a list of sponsors along with their names, images, and links.

Follow these steps to proceed with the process:

  • Create a Google Doc using a Google account of your choice and configure the necessary content, including images and links.

  • Click on the “Share” button within Google Docs, then change the “General access” option from “Restricted” to “Anyone with the link.” After that, click on “Copy link” and then “Done.”

  • Paste the copied link into a text editor, extract the document’s ID, and replace the “XXXXXX” in the code provided below with the ID from your Google Doc link.

				
					<iframe src="https://docs.google.com/document/d/XXXXXX/edit?usp=sharing;rm=minimal" width="100%" height="100%" frameborder="0"></iframe>				
			
  • In your “my.conf.app” backoffice, add a “Code Embedded” miniapp and give it a suitable name. In the “Embedded code” field, paste the personalized code obtained from the previous step.

  • Save the miniapp, and then reload your confapp mobile app. You should now see the exact content you added in your Google Doc.

Check-in function

You can accomplish event check-in function through a mini-app. There are some full featured check-in tools on the market, but they would be overkill probably. For example you could use a google form to create a “check in” form, where the participant submits some check-in data and you could collect this data on the google form side. The google form could be embedded as a mini-app.

Participants Chat App

If you need to create a space where participants can chat freely. 

You can use a simple web chat tool like https://quickchat.app (or https://tlk.io)

To proceed with the process, follow these steps:

  • Create a chat channel on quickchat.app, ex: https://quickchat.app/#/666efa3c76be35841b618dee

    (replace the URL with the one you get from quickchat.app)

  • In your “my.conf.app” backoffice, add a “Web page” miniapp and give it a suitable name. In the “URL” field, paste the link https://quickchat.app/#/666efa3c76be35841b618dee

  • Save the miniapp, and then reload your confapp mobile app. You should now see the chat room appear in your mobile app, under the app icon with the name you entered above.

Downloadable documents

If you want to embed one document that the participant can read directly from the App, use the “Web page” miniapp, and put the url of the document in the URL field. This option is useful when you want to provide specific information to your audience and you don’t want to overwhelm them with too many documents.

But, if you have a long list of documents that are relevant to your topic, you can use the “Rich text” miniapp. This allows you to insert links to multiple documents and even add some descriptive text about each one. By using this option, you can provide your audience with a variety of resources and information that they can access at their own pace.

App Theme

Background image

You should try to match your typical target audience screen size, usually 1284 x 2778 (to match iPhone 14 Plus screen size) or 1170 x 2532 is good. The app will resize automatically the image for different other screen sizes 

Font selection

Conf.app allows you to customize the font throughout your whole app, however this won’t be applied to external tools such as Google form. You need to select a similar font in Google form if they offer this possibility.

/*! elementor - v3.21.0 - 26-05-2024 */ .elementor-widget-image{text-align:center}.elementor-widget-image a{display:inline-block}.elementor-widget-image a img[src$=".svg"]{width:48px}.elementor-widget-image img{vertical-align:middle;display:inline-block}

Live stream

Any tool that provides an access URL or an embed code can be added to conf.app through the “Mini-apps” mechanism. When you edit an agenda entry, you can embed the js/html code from your conferencing or live streaming tool into the agenda entry. Your participants will be able to use the conferencing tool you added from their mobile app.

Just follow the instructions from zoom.us to stream the meeting to Youtube (https://support.zoom.com/hc/en/article?id=zm_kb&sysparm_article=KB0062284) or to Vimeo (https://help.vimeo.com/hc/en-us/articles/12426925043217-Stream-a-Zoom-meeting-to-Vimeo-Live) and then embed the video player code to conf.app (instructions). Then whatever you present in your desktop Zoom session would be streamed to conf.app users.

Invite attendees

All available options can be found under the “Access My Event” menu item. However, it is not possible to send invitations directly through the platform.
You may use your own mailing tool to invite users to download the application and scan the event QR code to access it.

Track attendees

The Conf.app solution does not make it possible to identify each of the users individually within the application and to be able to follow them throughout their use. Each connecting user is anonymous. 
Nevertheless under the “Notifications” menu entry, you can see the number of persons who installed your app.

Free plan

By default, your event is on the ‘Free’ plan.

You can utilize all features available in the free plan without any restrictions, even for business events.

If your event requires additional features such as more mini-apps or increased participant capacity, all paid options are listed on the Upgrade page.

Please note that until you ‘activate’ your event, you can test all features without limitations, except for the mobile app, which can only be tested by a maximum of 5 testers. We encourage you to utilize the ‘non-activated’ mode to set up your event app and activate it only when everything is ready. During the activation process, you will be reminded of any additional options you may need to purchase.

Billing info

You can manage your billing information by adding, editing, or deleting it on the billing page. You can access the billing page by clicking on your user avatar at the top right corner.

Additional features

Every plan you choose can be enhanced with additional features.